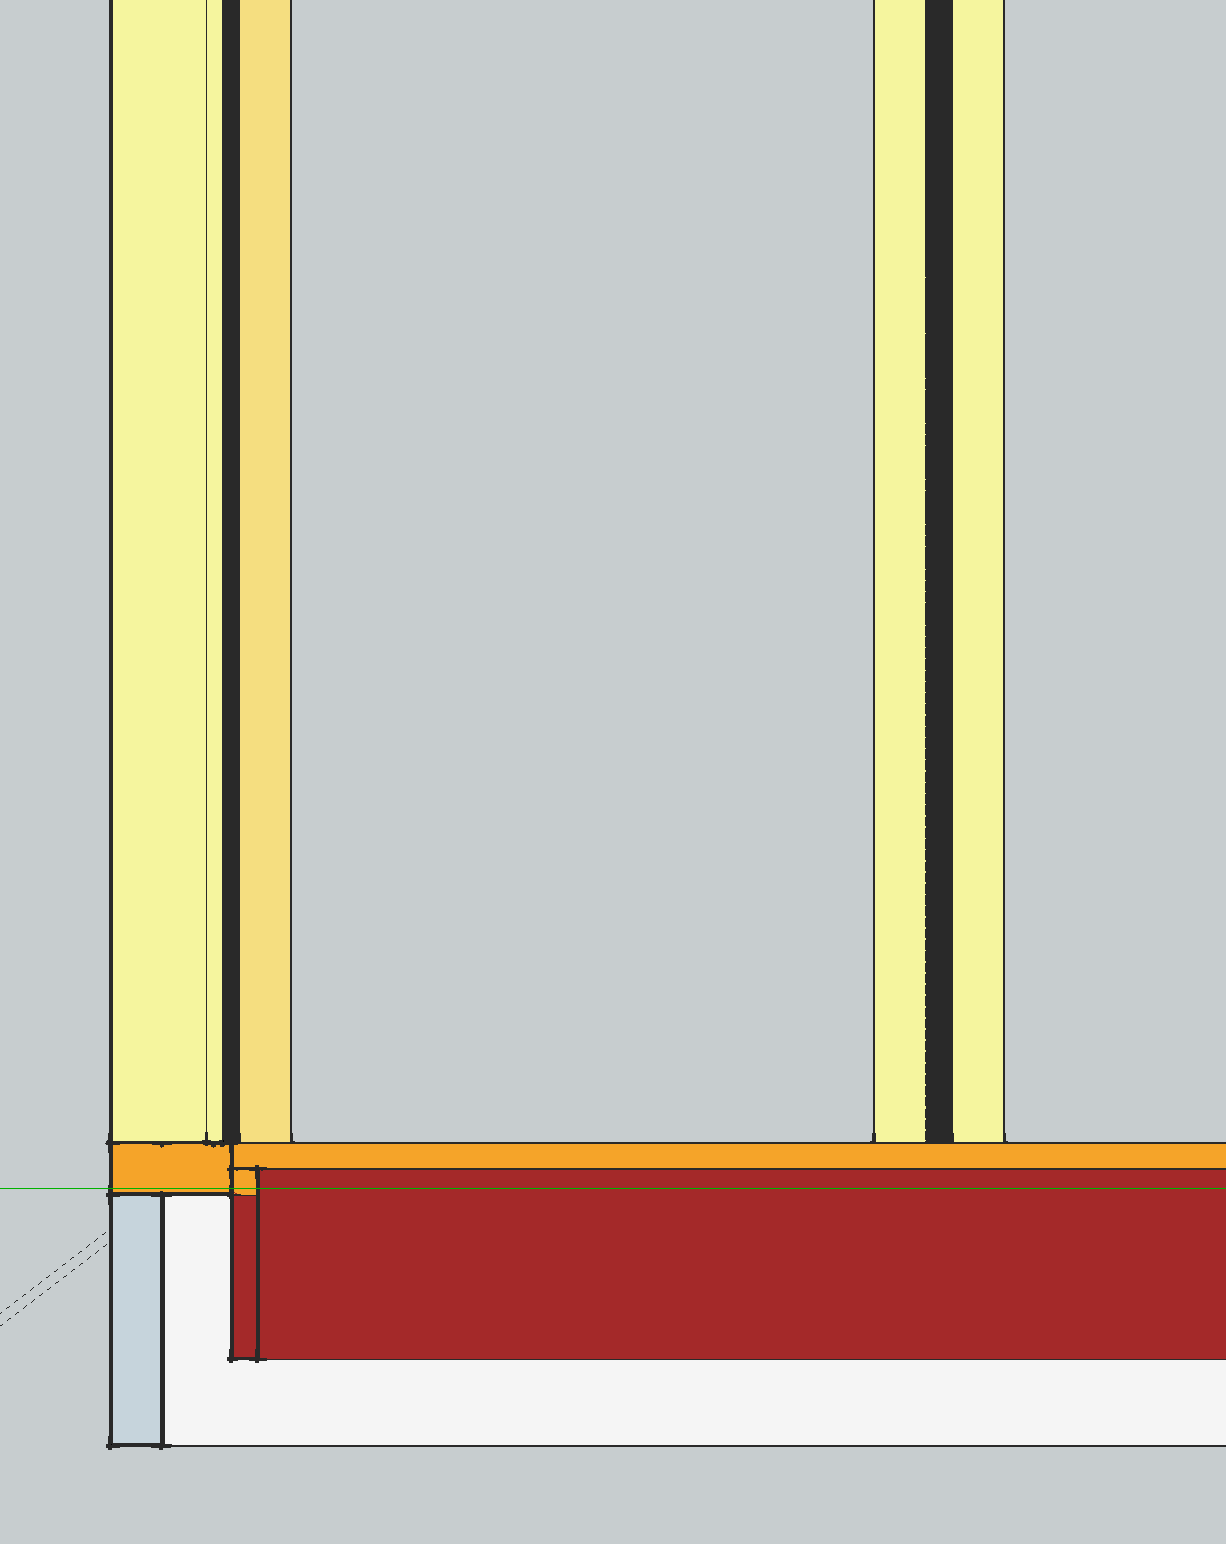
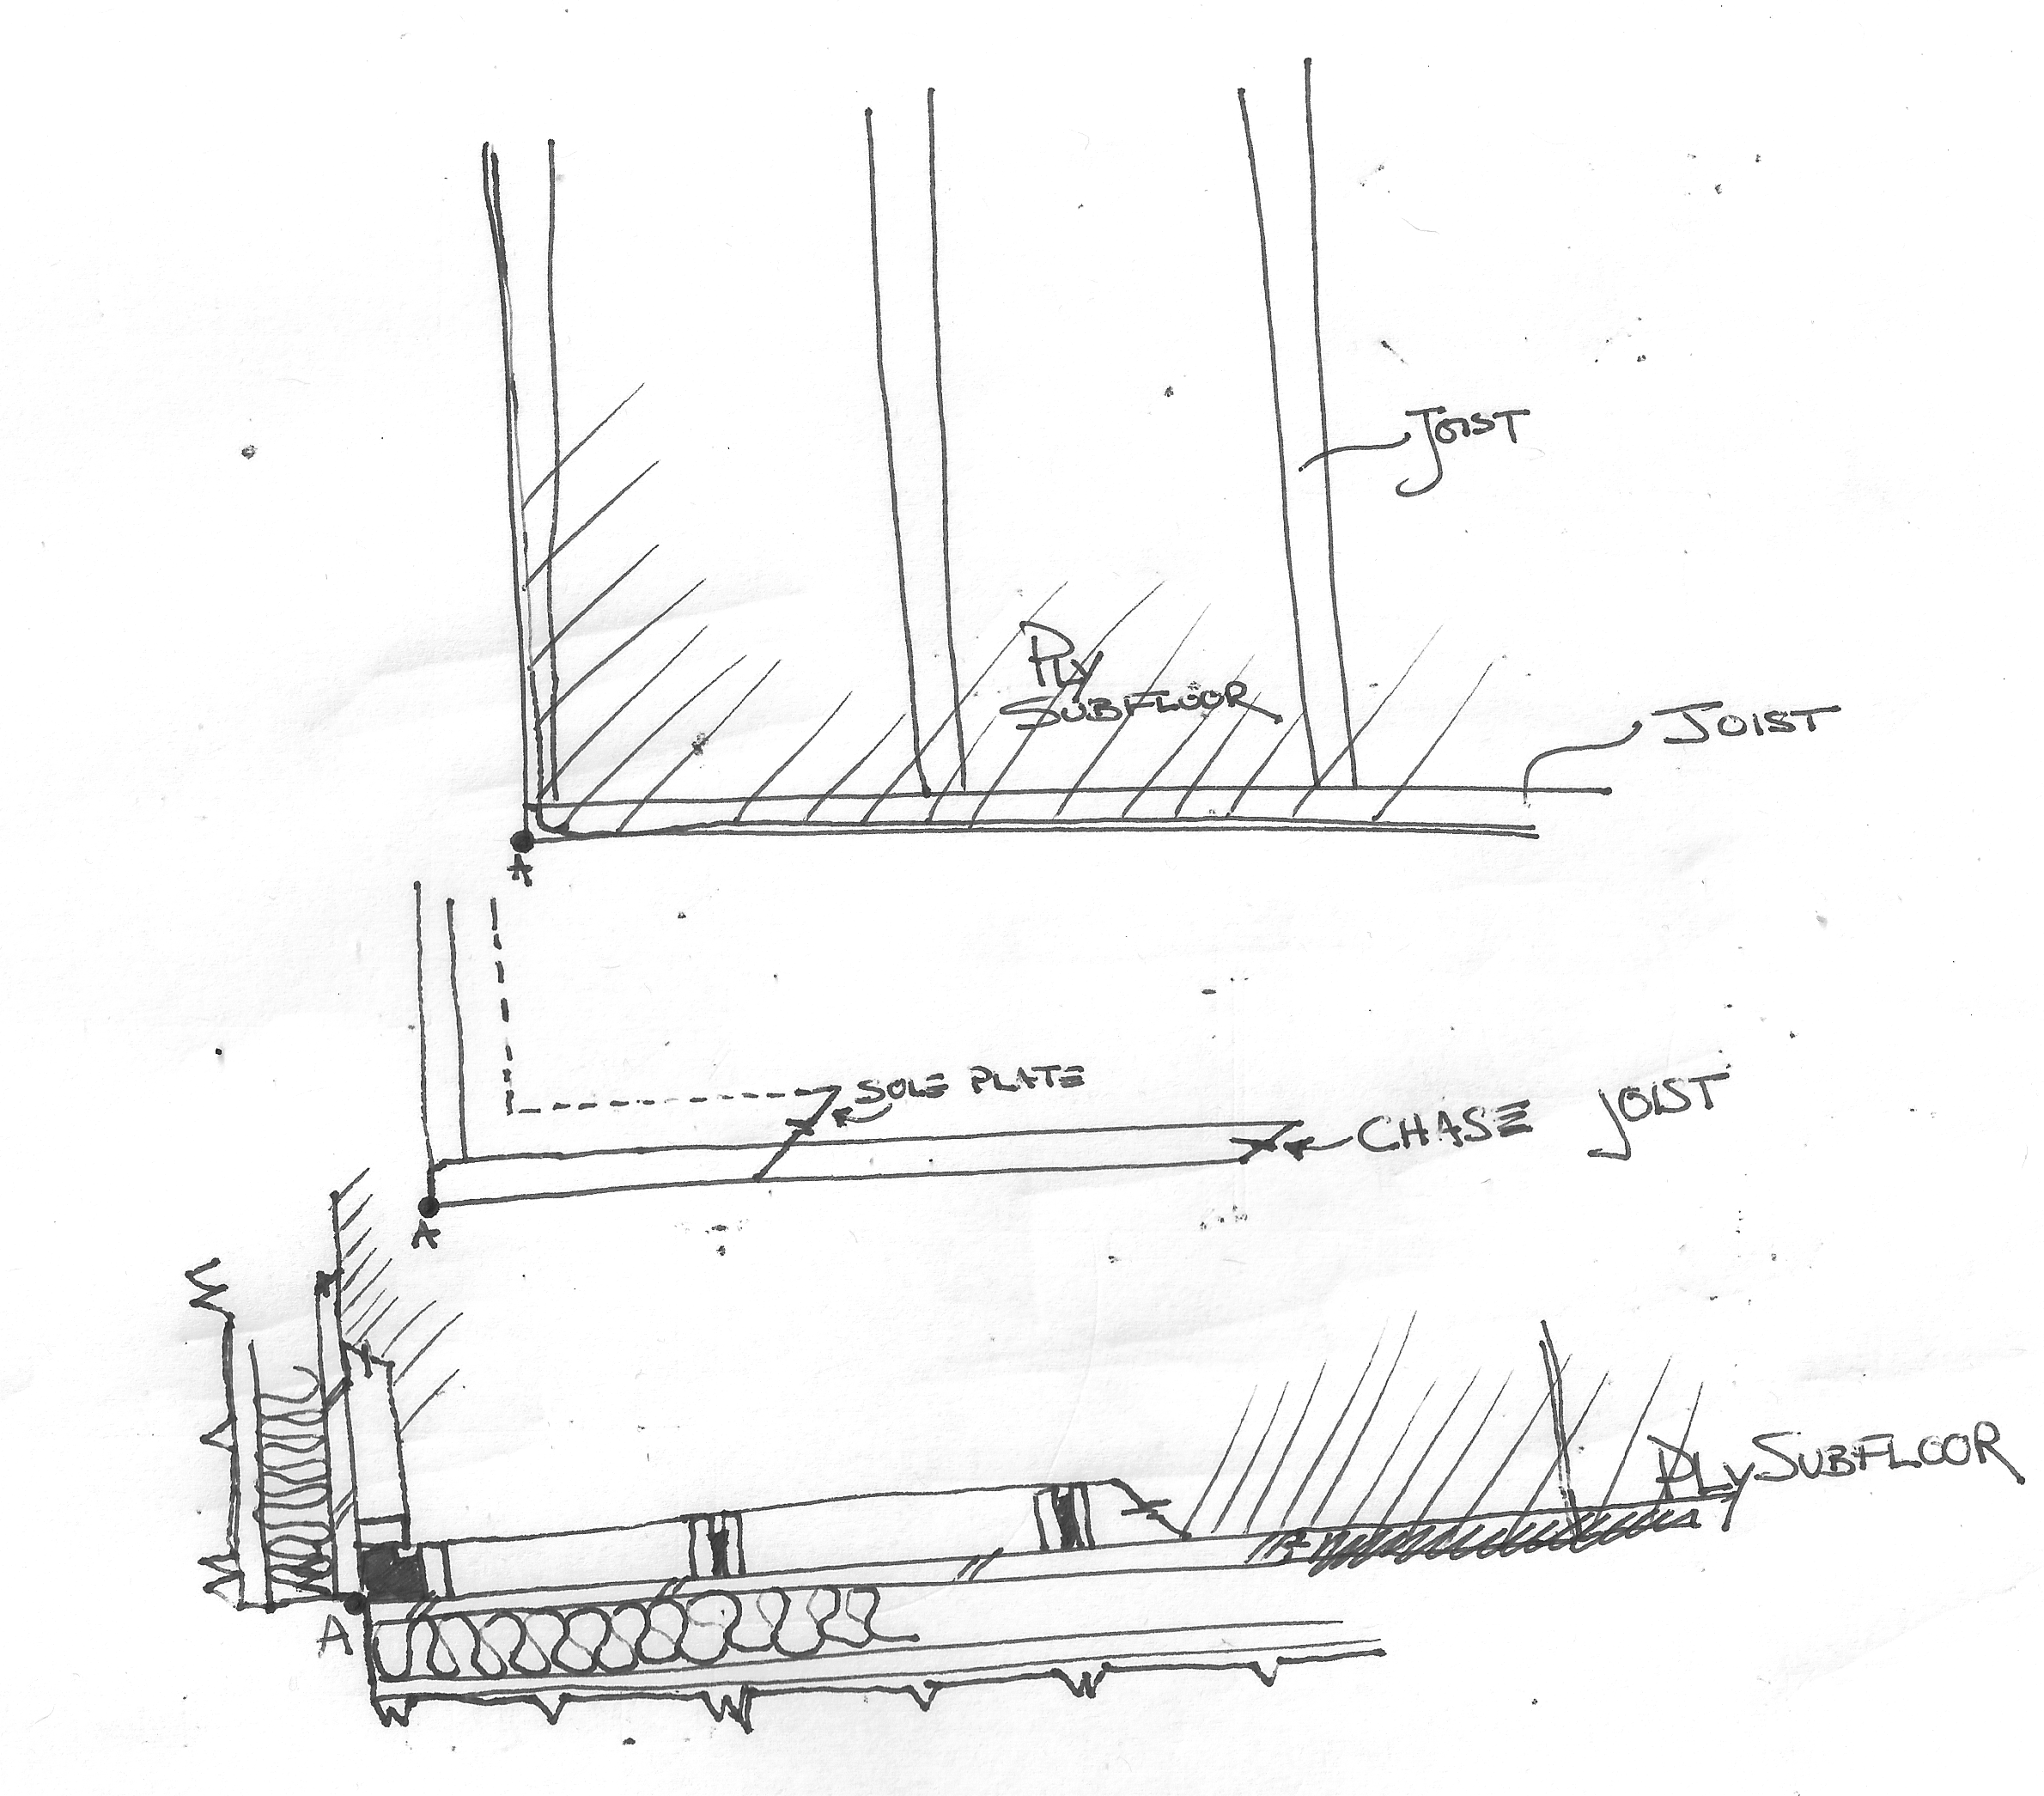
Note in the bottom left of the above drawing, you can see that the wall plywood is 8', with another strip of plywood below it. This is the floor-to-floor shear tie.
First Version 2017-10-31
Updated 2017-11-16
copyright (c) 2017 LaramieCrocker.com
On the property is an existing 3 BR/5 BA cottage that is my current house.
I plan to build a three-unit, three storey building on the property with a three-car garage. The floor plans will have a number of flexible points so that I should be able to turn the whole sheebang into one of these options (not including the original house):
Building permits in my area will take 2 years. In the meantime, I'm building two or three micro-houses that I can rent out in my garden. Really, they are just IKEA houses--designed to be disassembled and hoisted up to the upper floors of the new house, where they are reassembled and tied to the structure and flashed appropriately. They become the rooms of the permitted third storey.
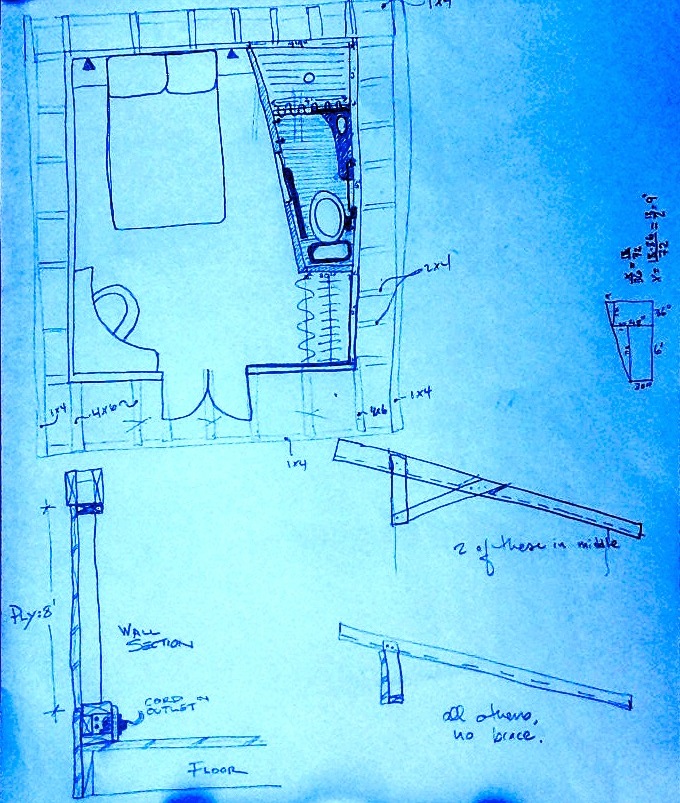
This up-to-date drawing shows trapezoidal BA:
Note in the bottom left of the above drawing, you can see that the wall plywood is 8', with another strip of plywood below it. This is the floor-to-floor shear tie.
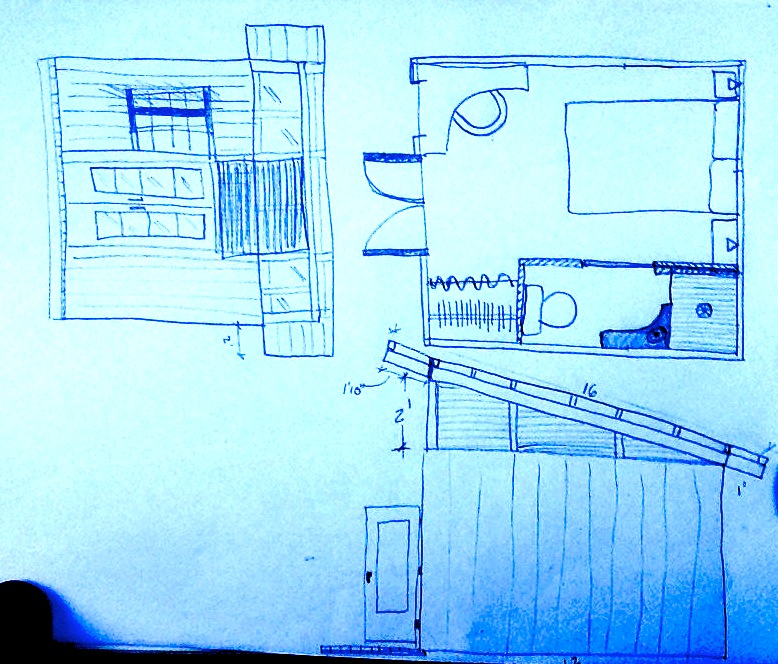
This drawing shows the elevations, but also the obviated rectangular BA plan:
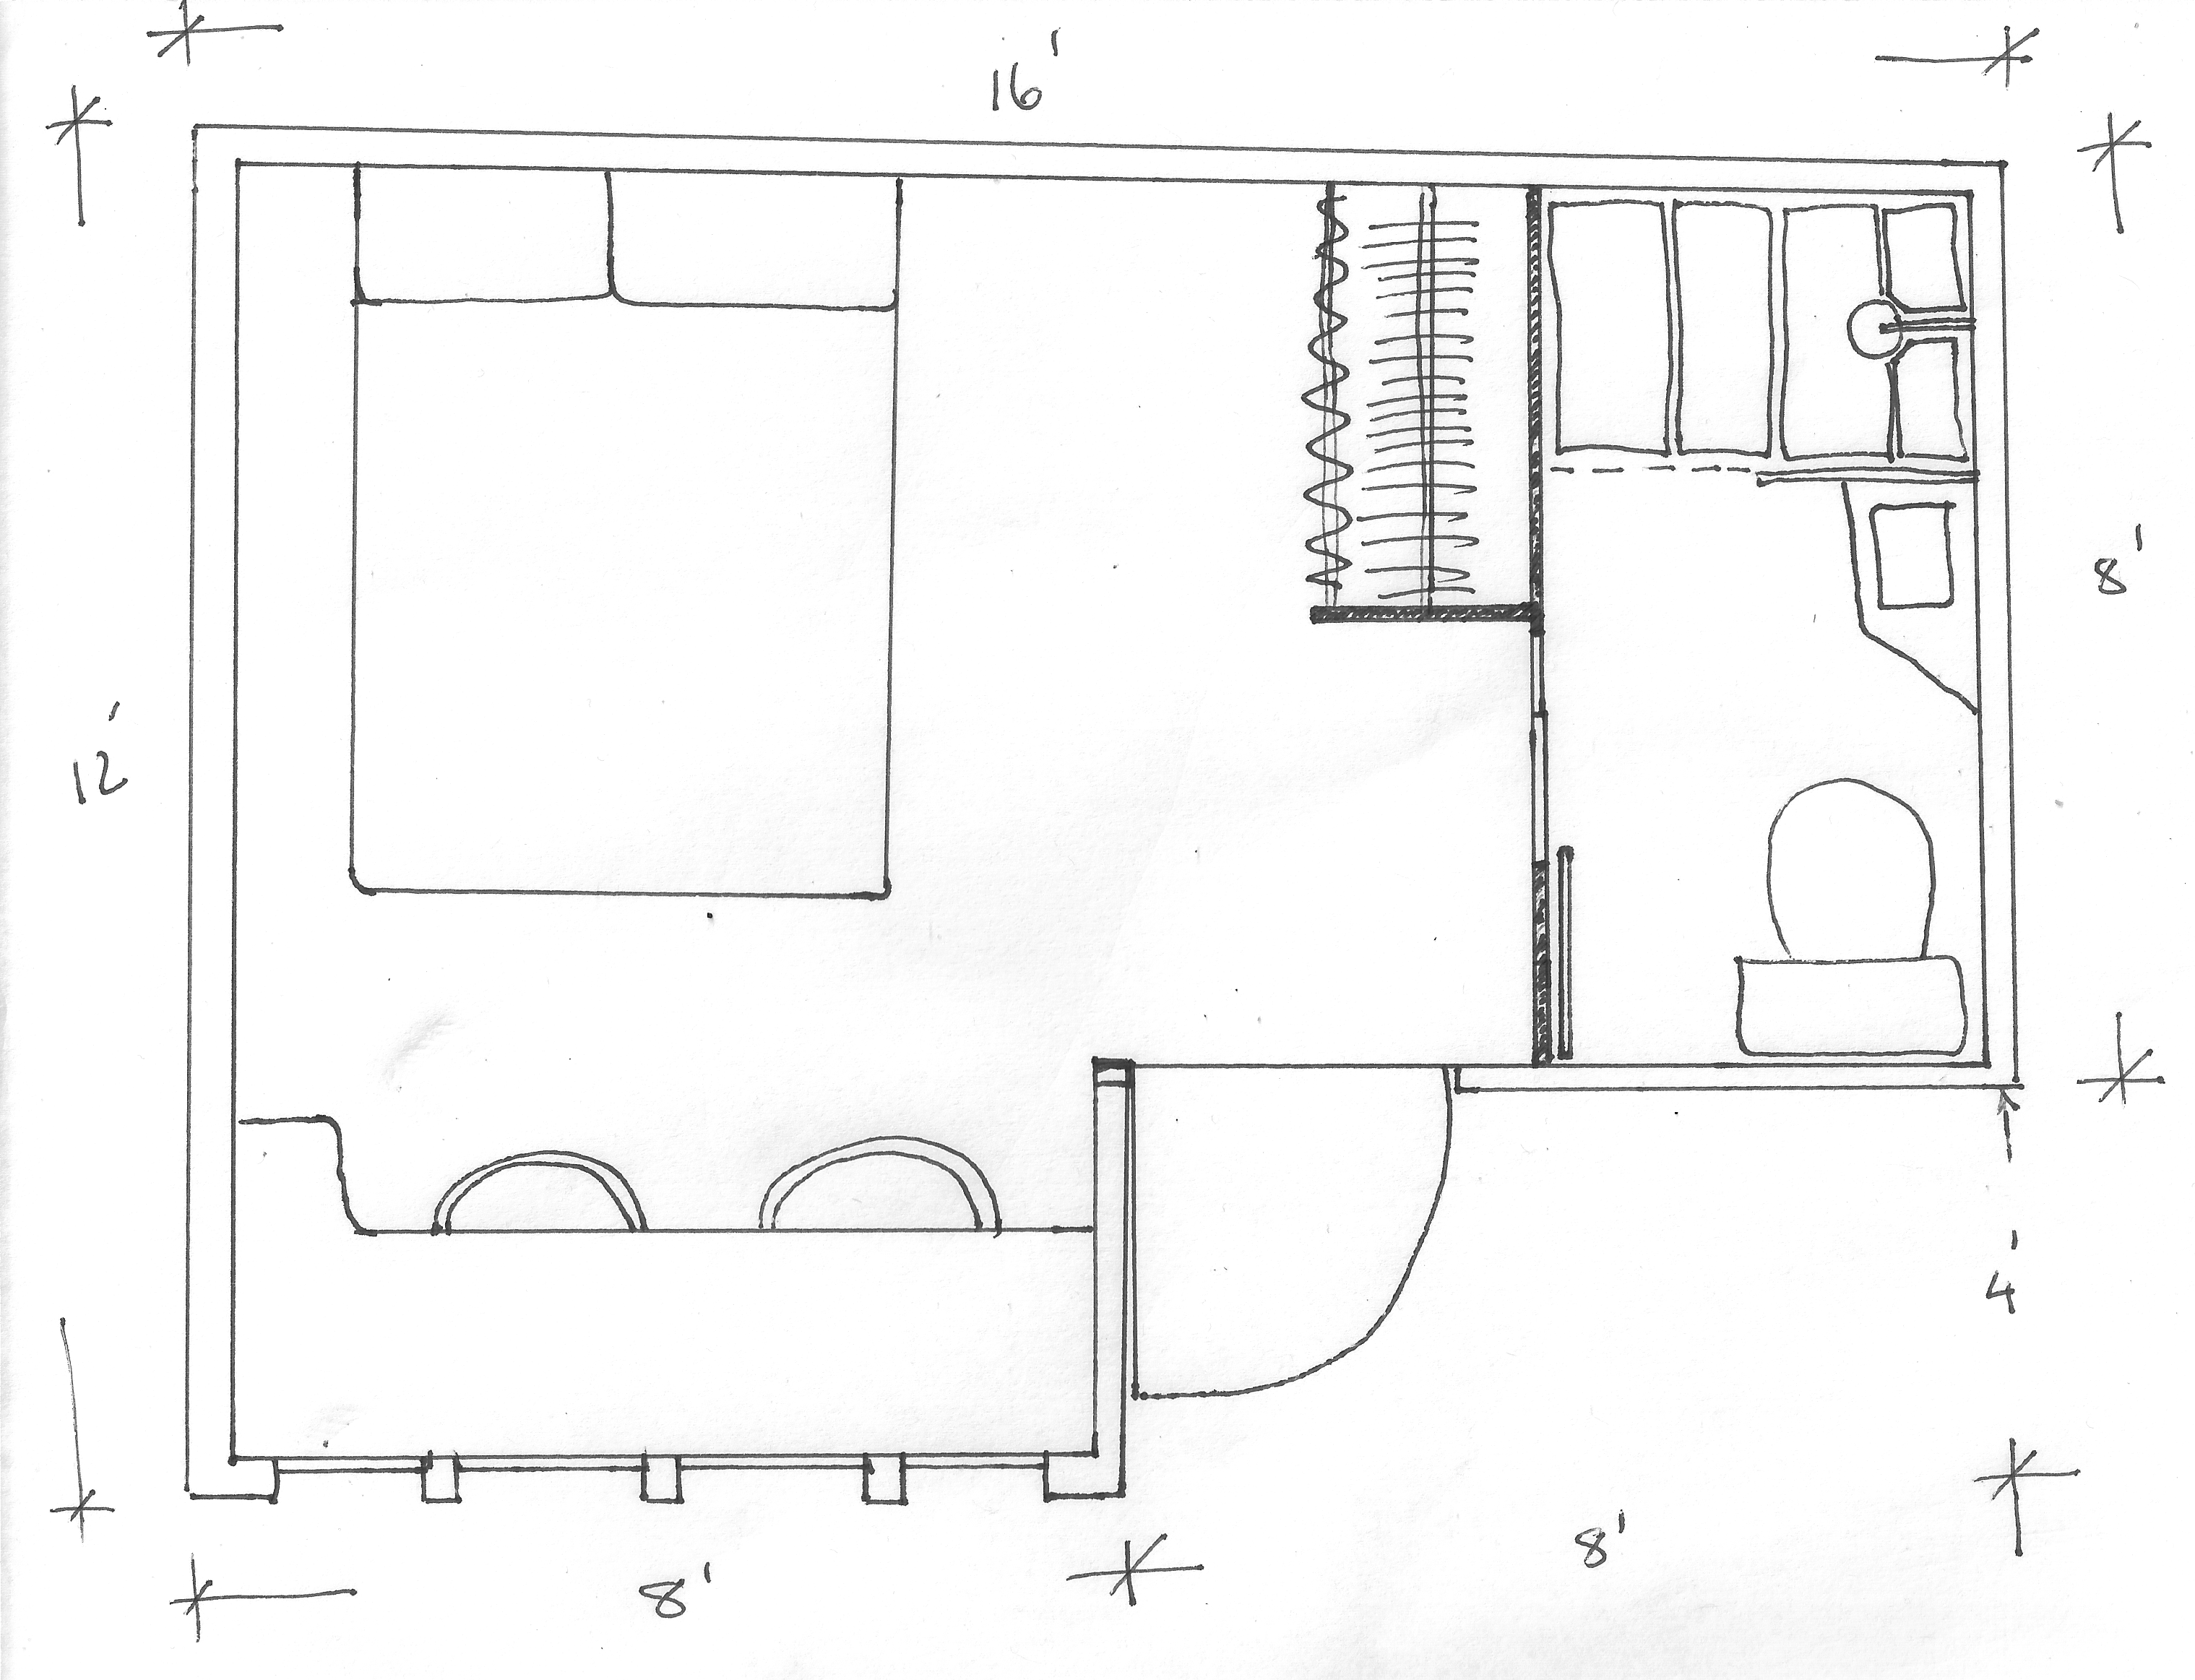
Here is another option, with an L-shaped plan:
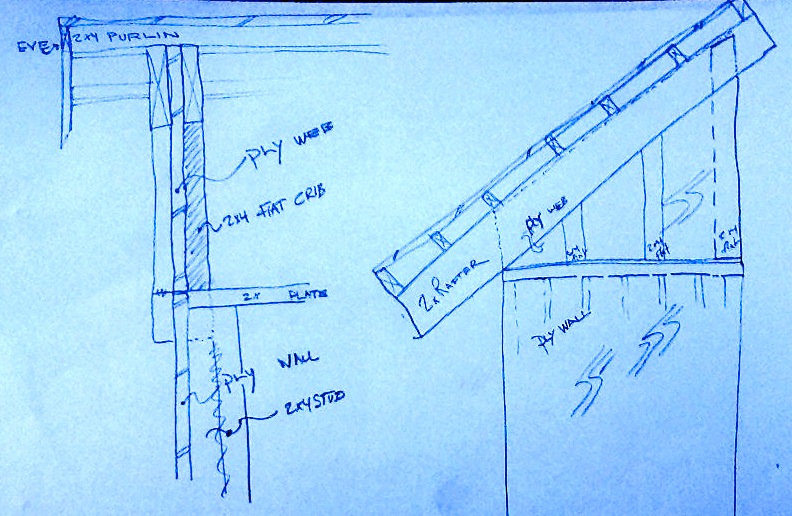
This drawing shows the roof frame and angled wall top detail:
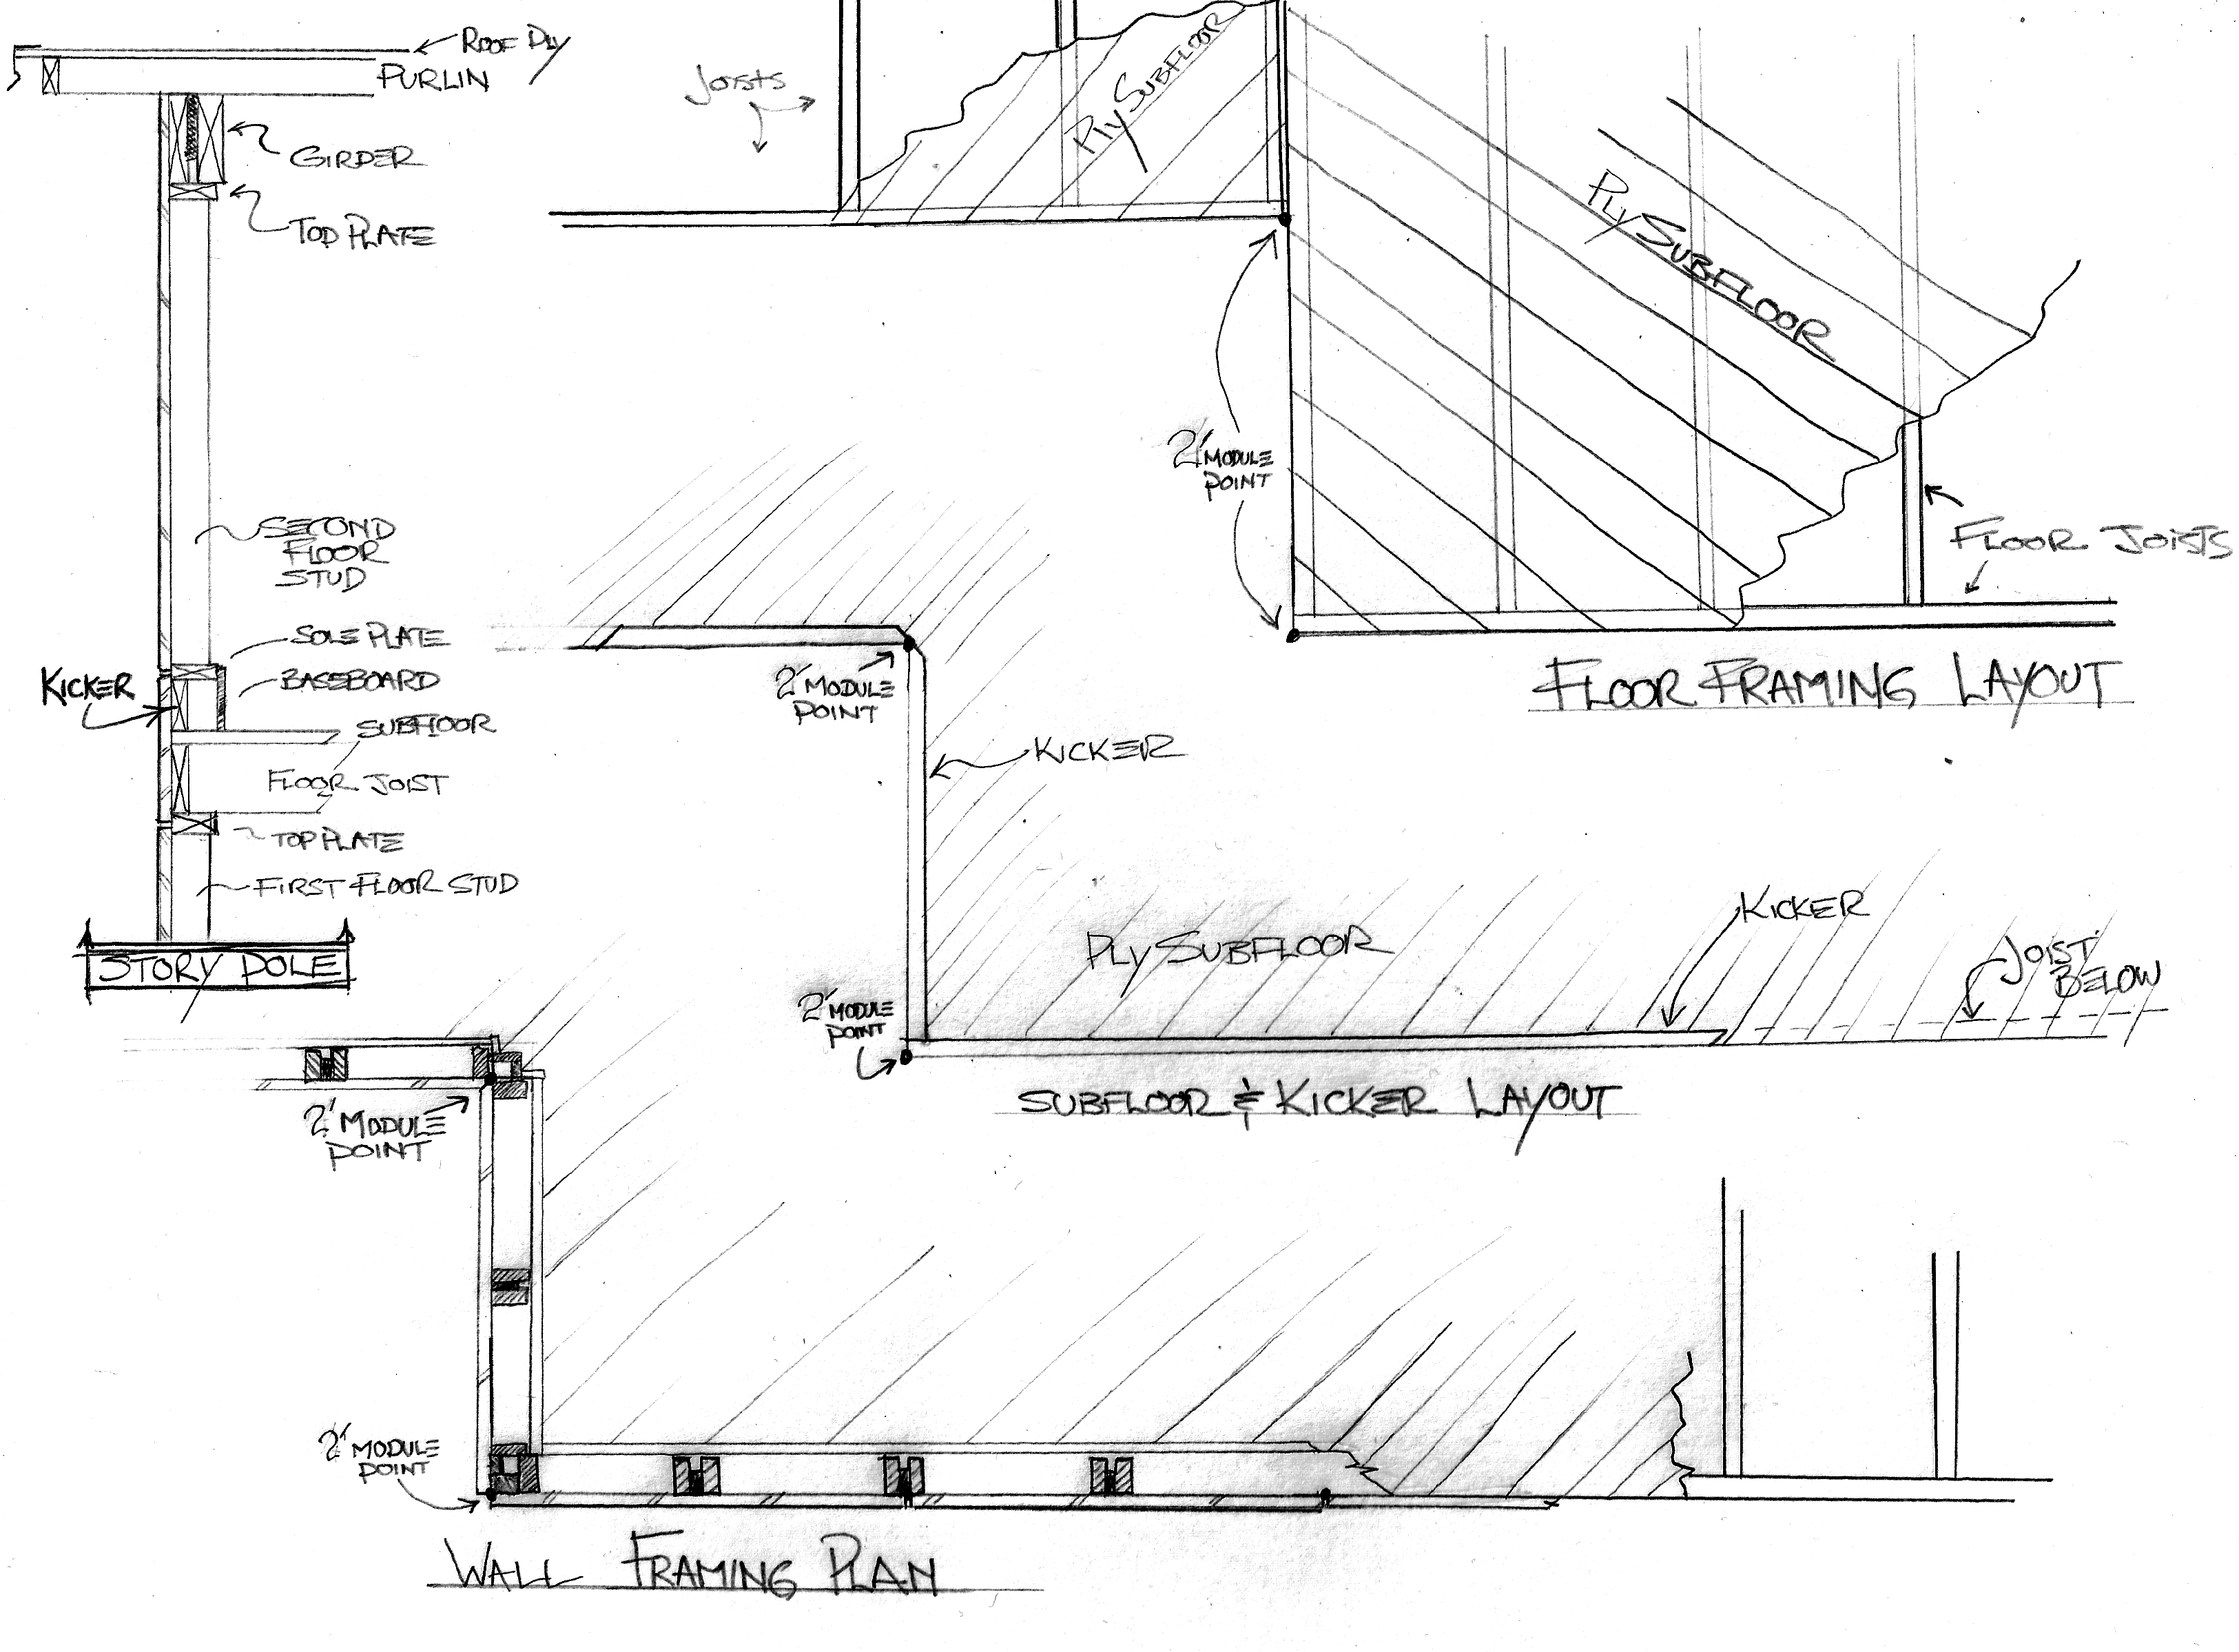
The entire cottage is done on 24" modules, so cutting is minimized. I'm limited to wanting to buy 16' maximum length lumber and do it all in single pieces. So for example, 12' rooms means 2' eve overhangs on all sides. Walls are built from 8' studs and 4'x8' plywood. Floors and ceilings also use standard sheet goods. Metal siding is 24" wide, and insulation units are 4'x8' and 2'x4'.
The room comprises wall panels, floor panels, and roof panels atop built-up roof truss girders.
The design uses exposed, finished wood construction materials upgraded a bit, planed, stained and oiled. Plywood is all A grade fir, or shop grade in birch/maple, and C grade fir for ceilings. #2 and better construction fir that has been run through an S4S planer on site is used for exposed built-up studs and trusses. Additionally, electrical runs are in the baseboard chases, up door trim chases, and in some areas, run in exposed EMT (Eletrical Metallic Tubing). Copper plumbing lines are exposed, acid-washed, and shellac'd. Light fixtures are all surface mounted.
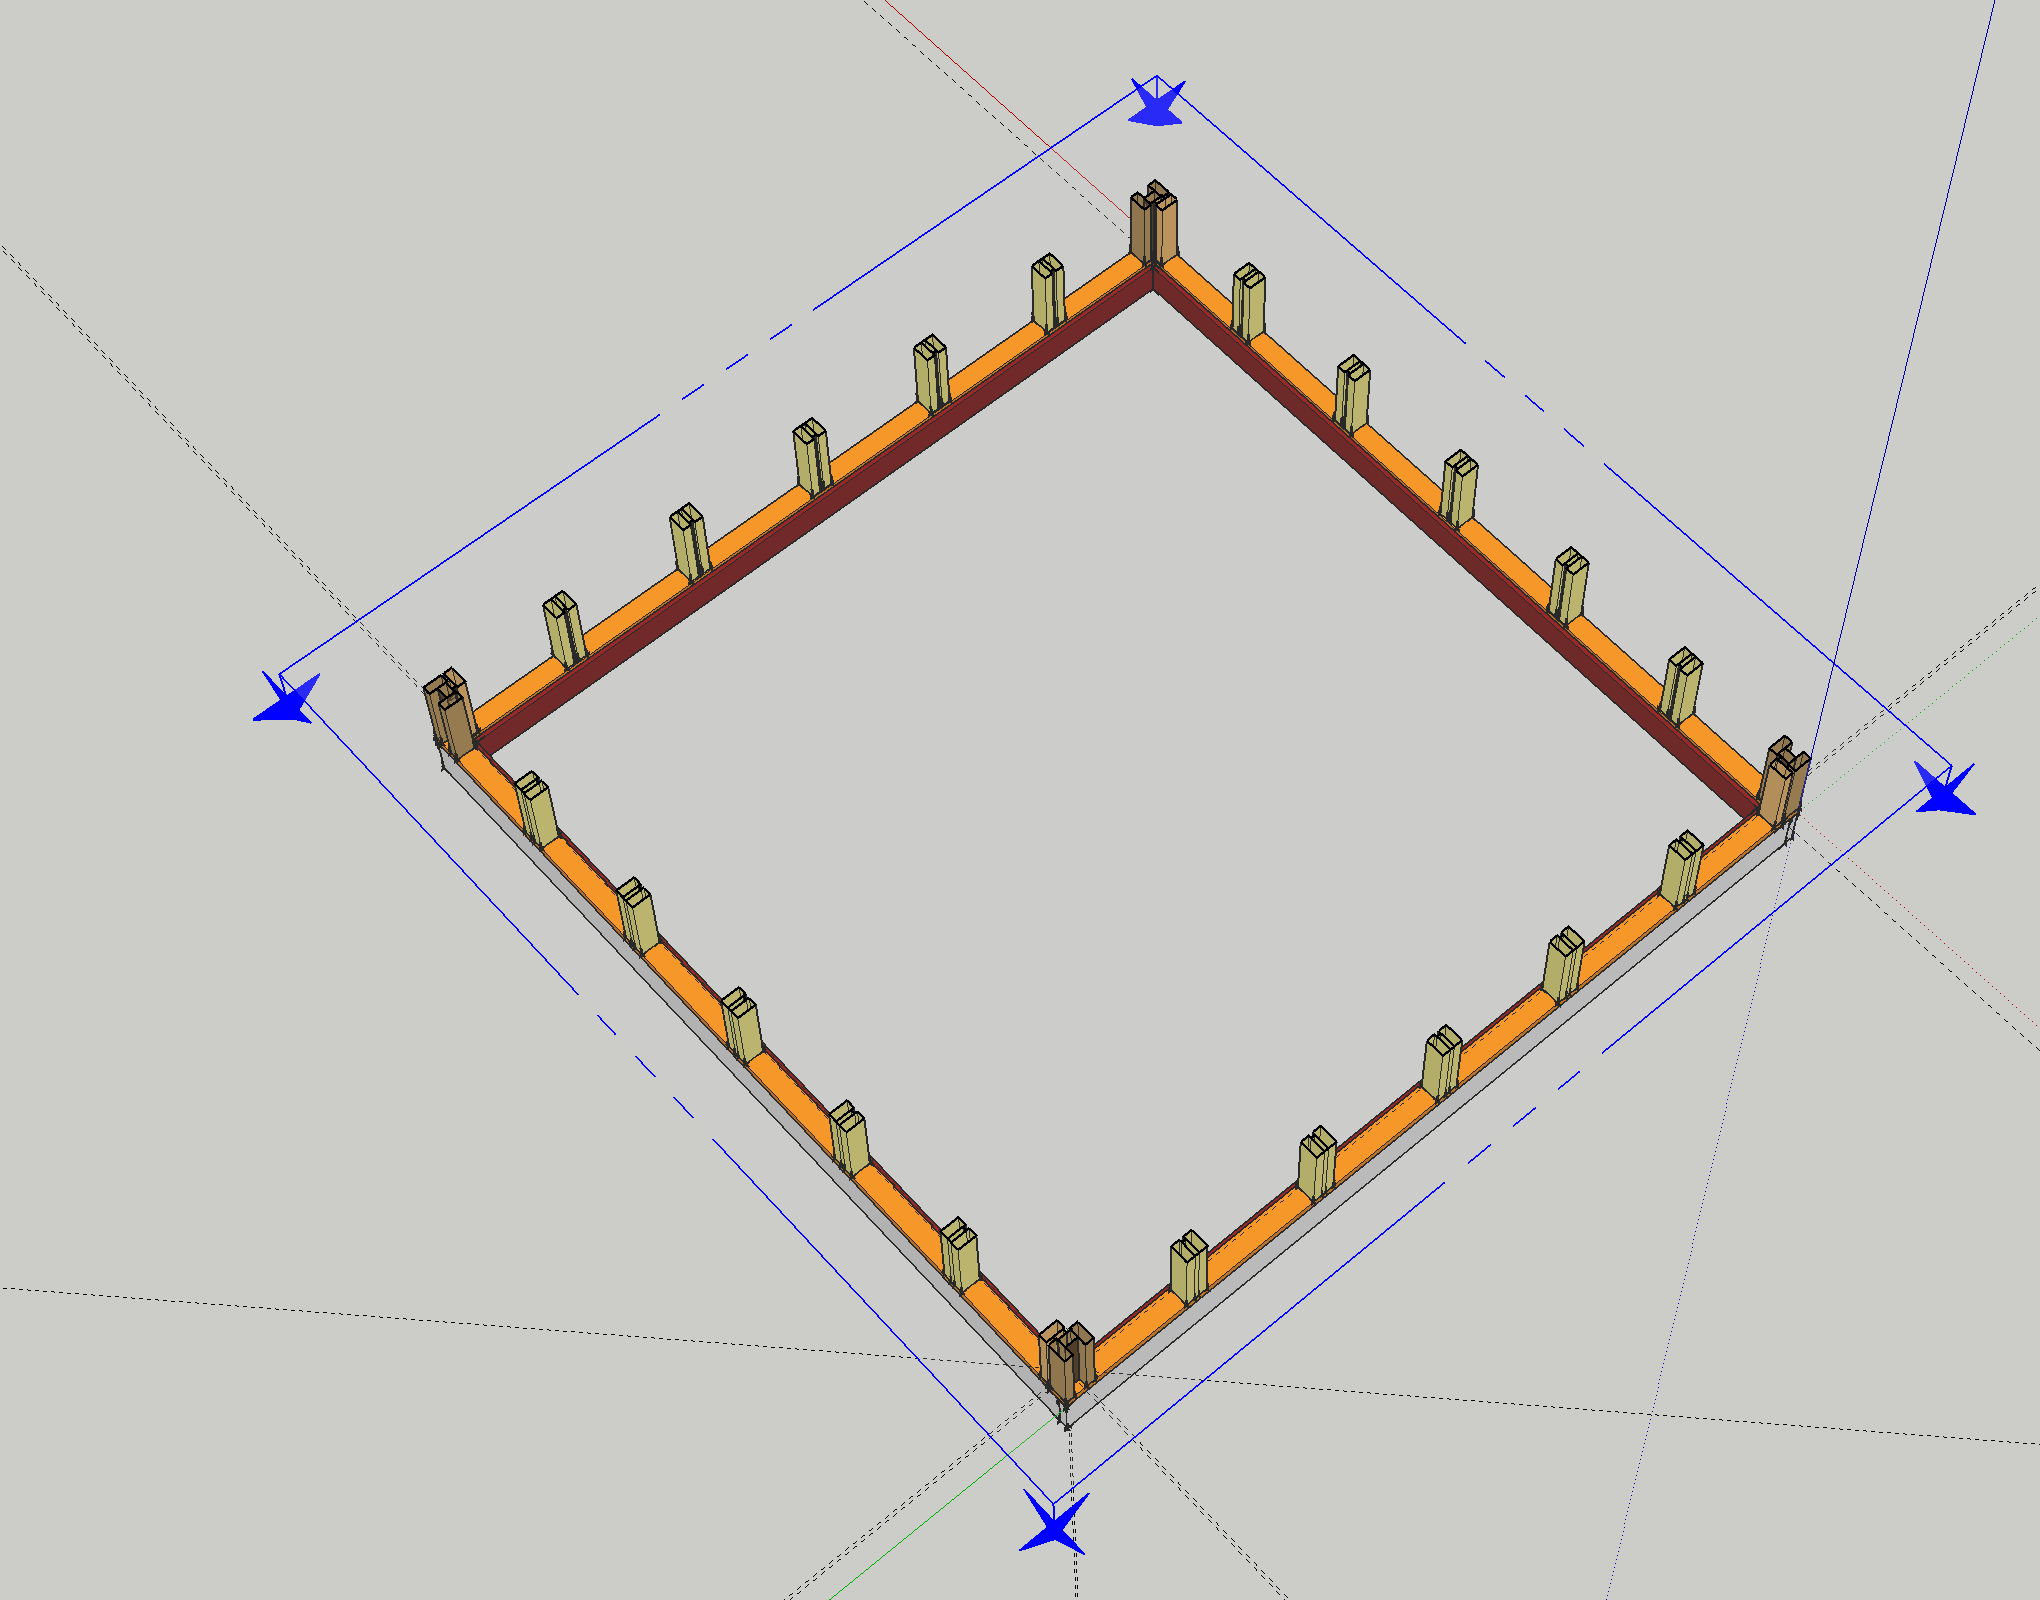
The studs are built-up from two 2x4's with a 1x3 spacer stained a dark color.
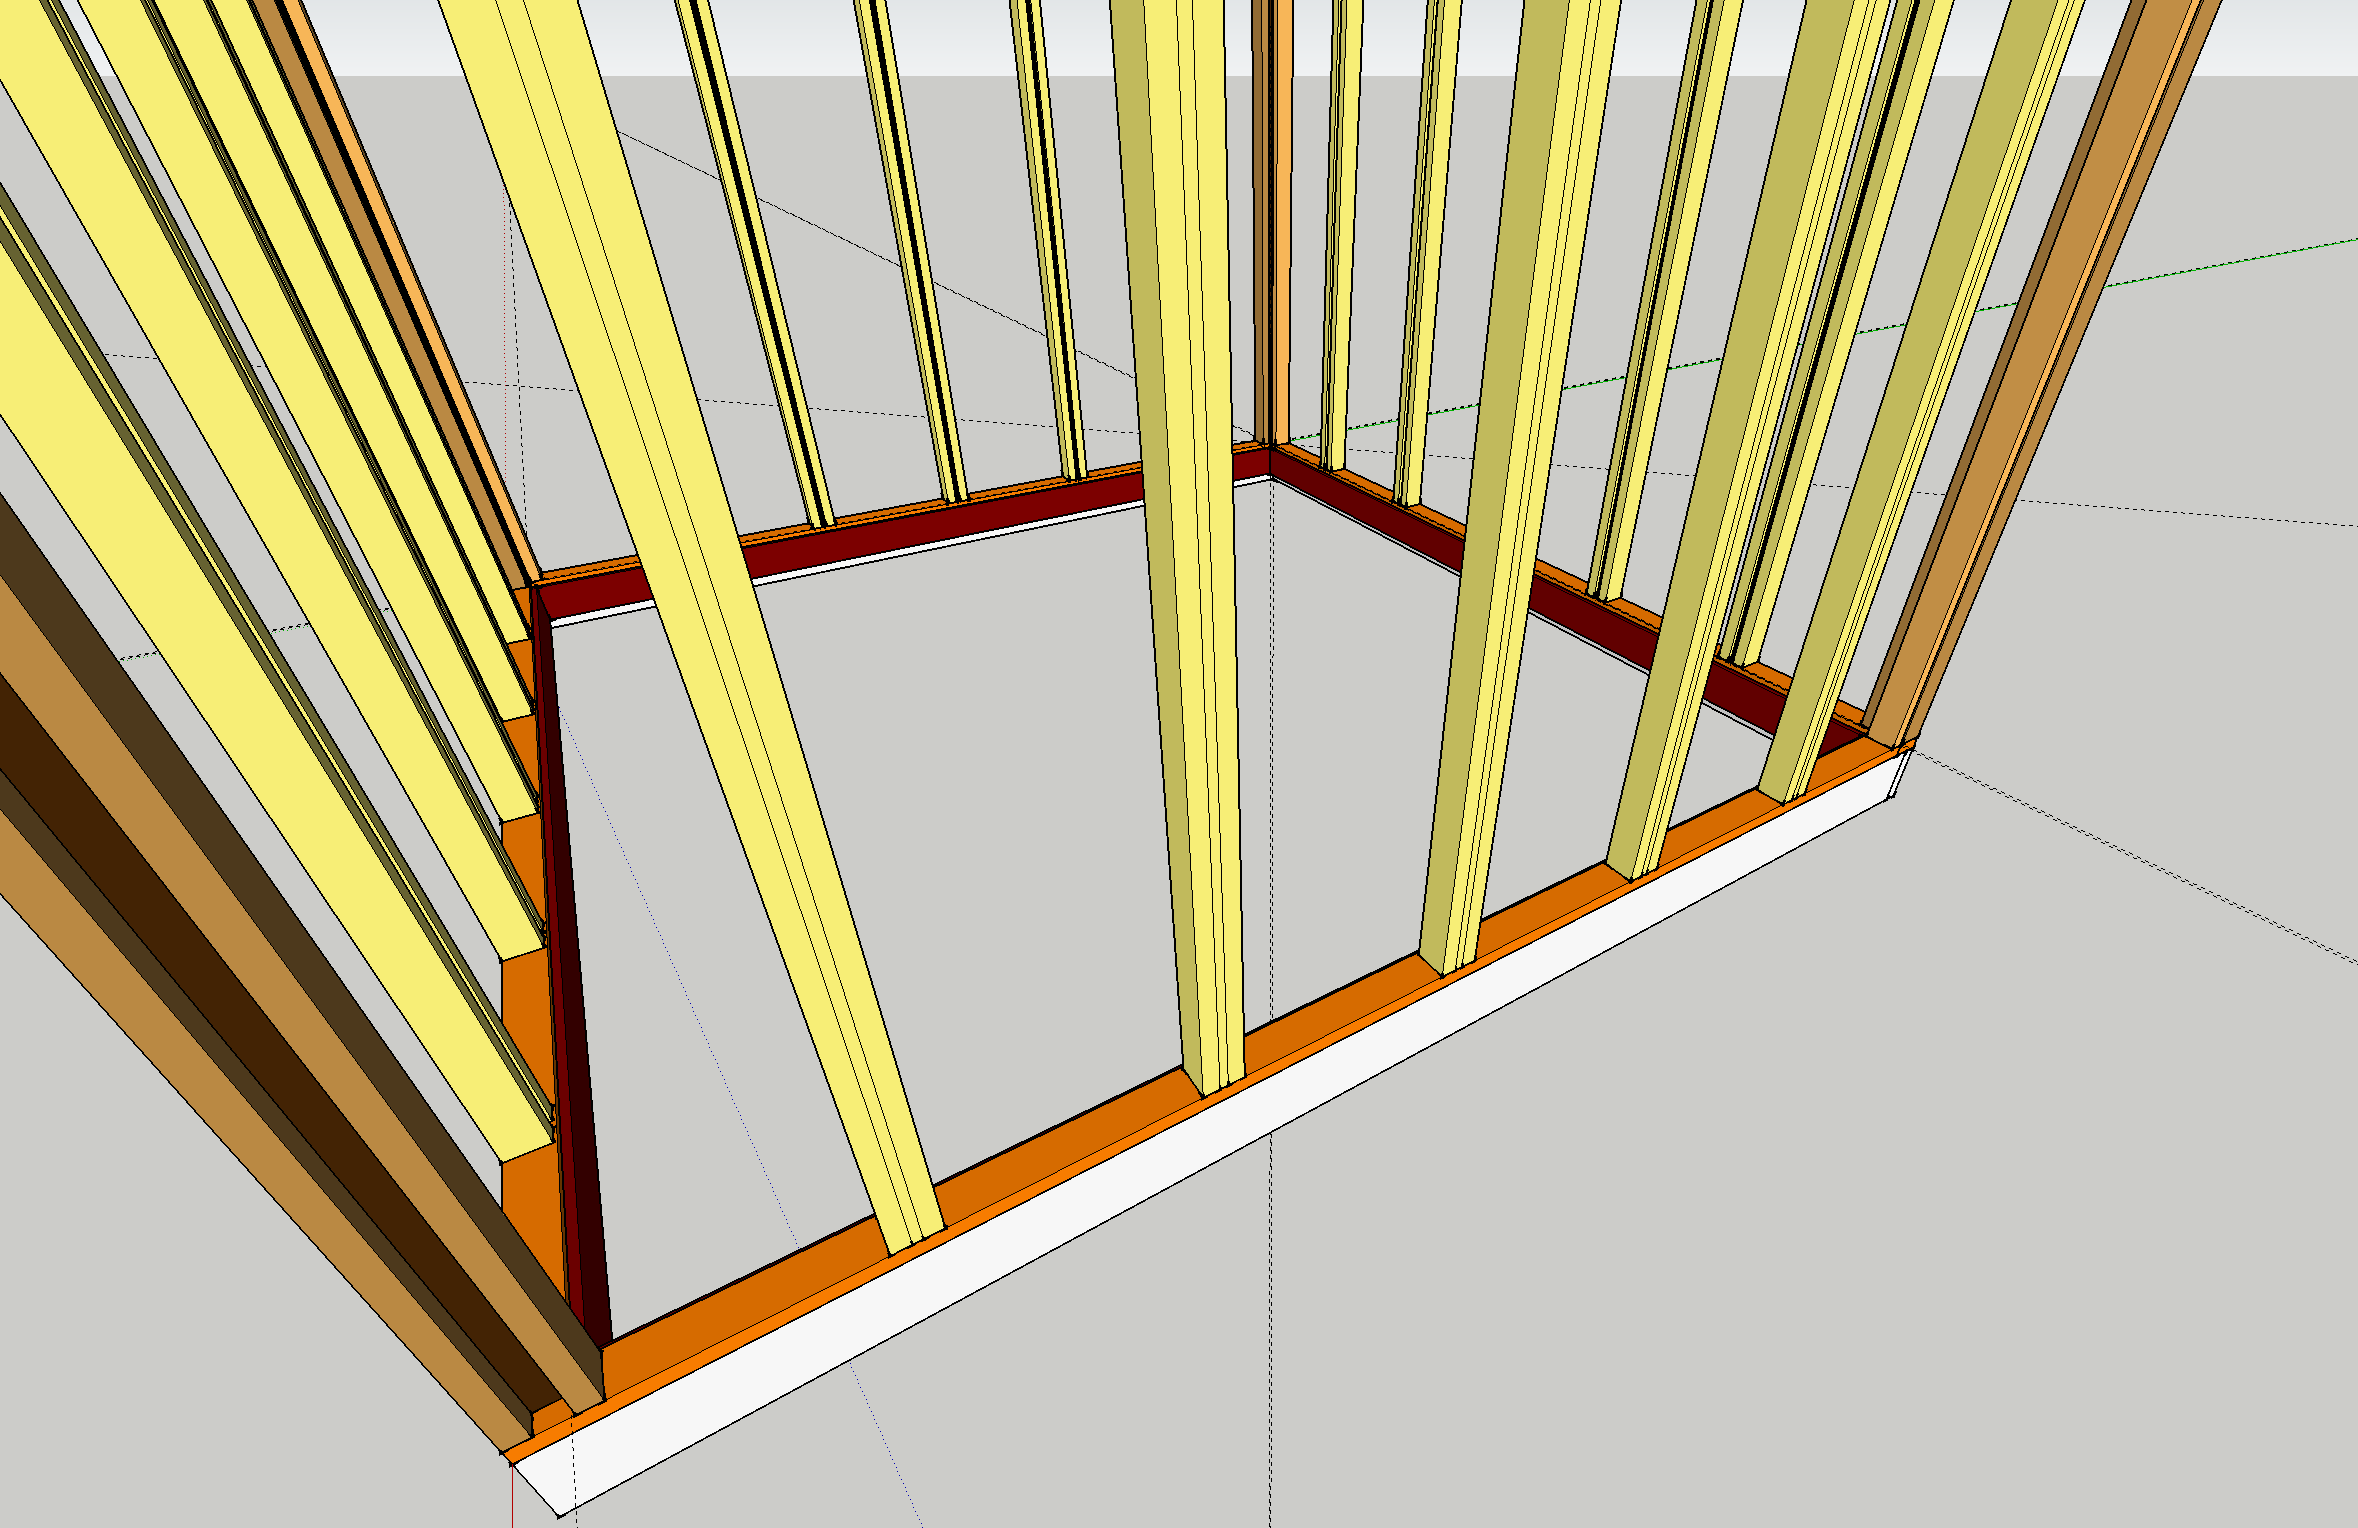
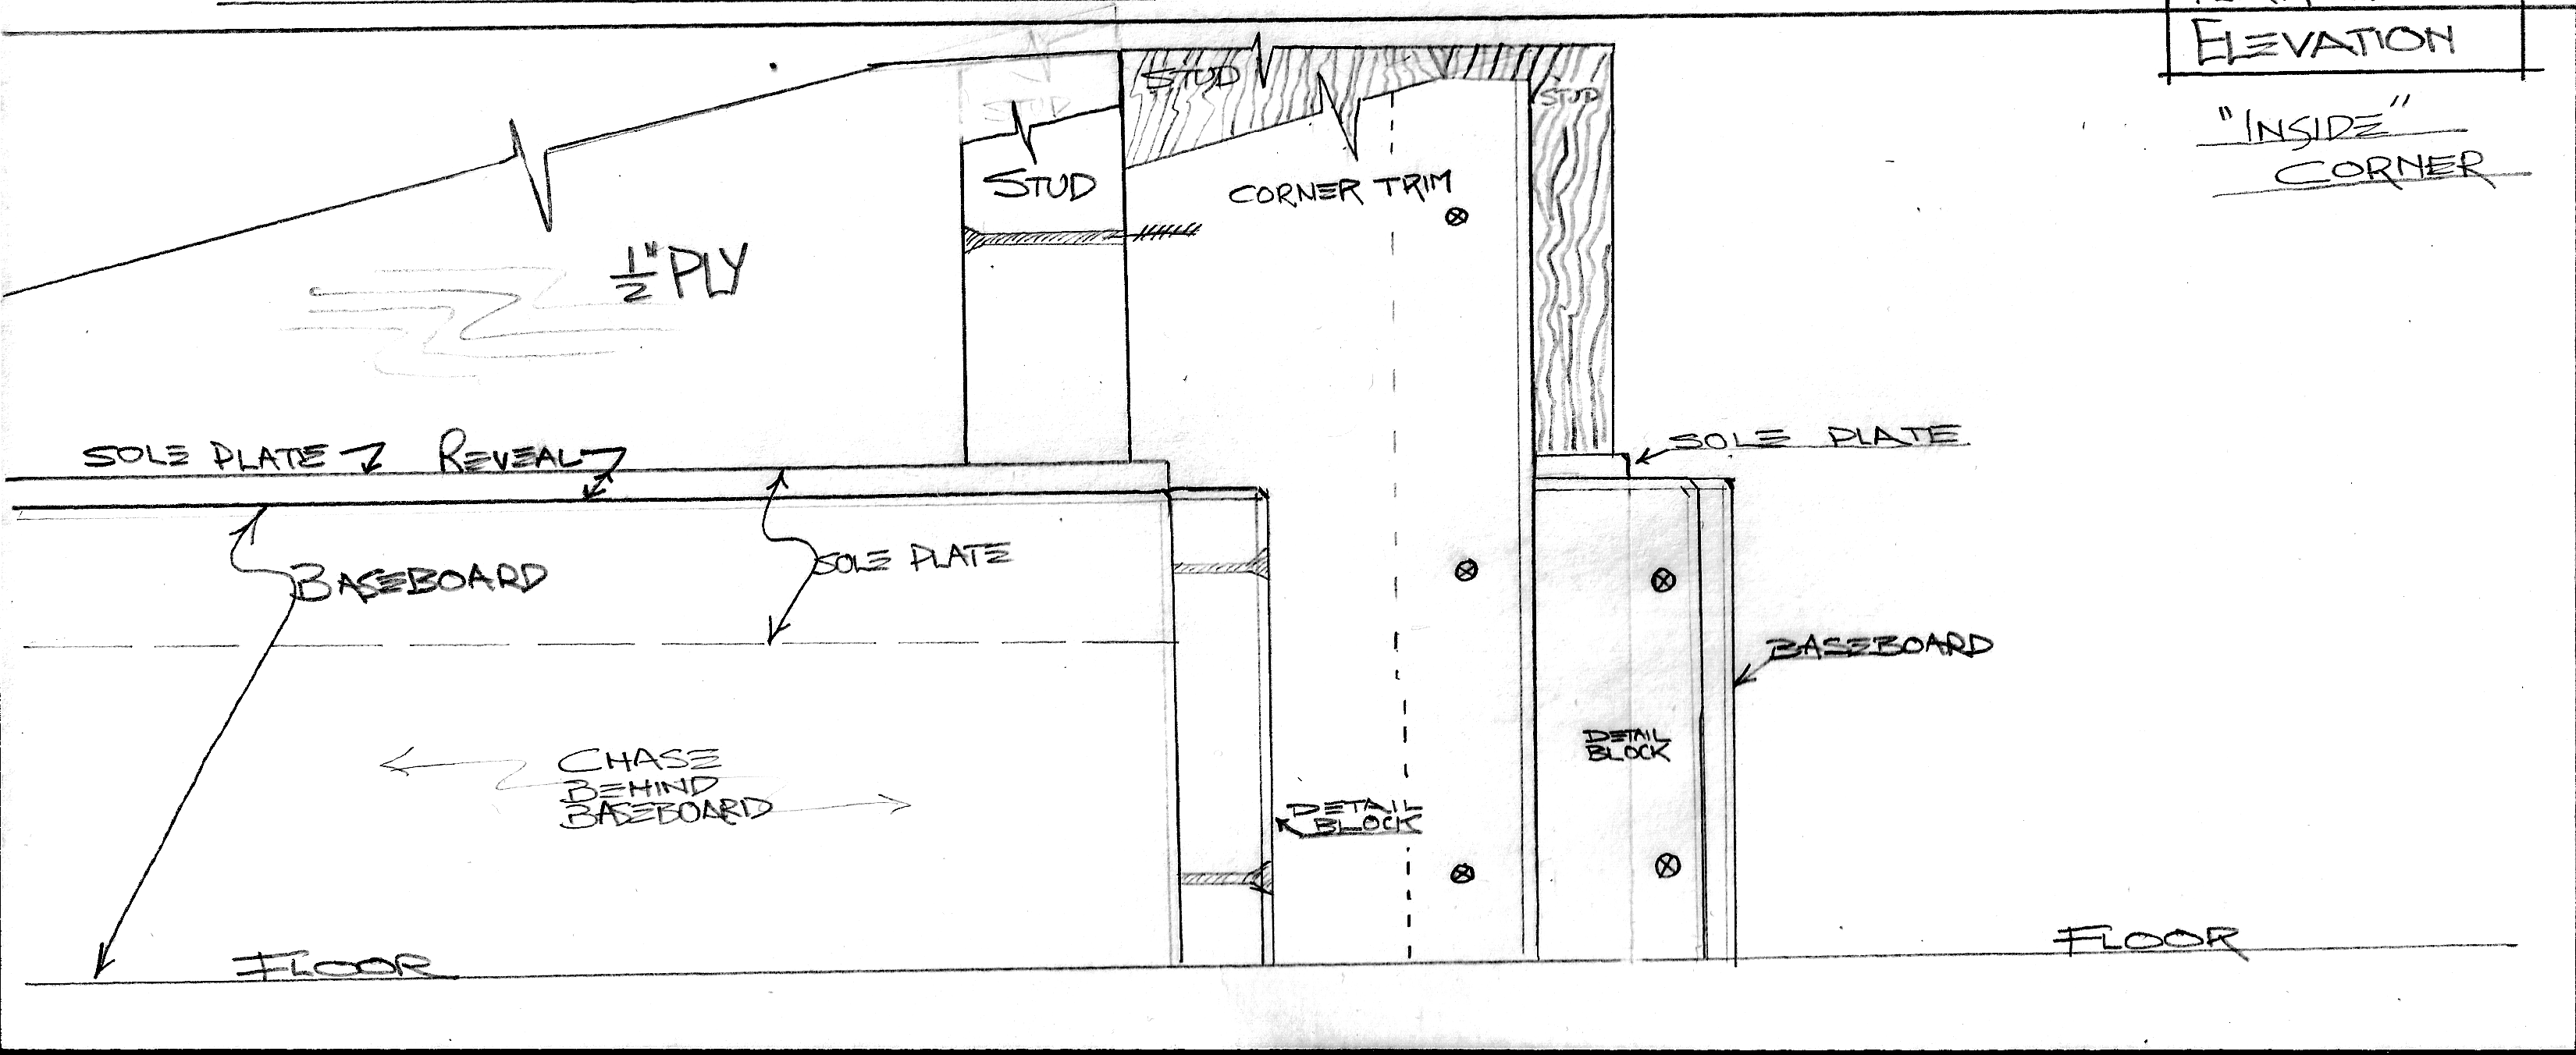
The wall panels sit atop a rim joist and a baseboard is screwed to the wall sole plate, leaving a wiring chanel between the baseboard and the rim joist. (Baseboard shown in red)
The baseboard is offset up from the floor to allow for insulation panels and finish flooring (plywood and finish material, or possibly lightweight concrete pavers for solar thermal mass).
Each wall panel comprises, from inside to outside: wood framing, shop-grade plywood, fire board such as Sheetrock if required, vapor barrier, fireproof rockwool pressed insulation board, wood battens screwed through insulation board to studs, tar paper, metal siding screwed to battens.
The walls are tied to the floor rim joists with horizontal strips of plywood that screw into the wall sole plate from the outside, the rim joist, and into the framing of the floor below. The flashing is worked out so that a water-table flashing slips below the wall sheet, and a strip of sheeting goes from the water-table to the top lip of the flashing that starts the floor below. So for assembly and inspection, the floor-to-floor ties can be built and flashed separately from the wall panels of each floor.
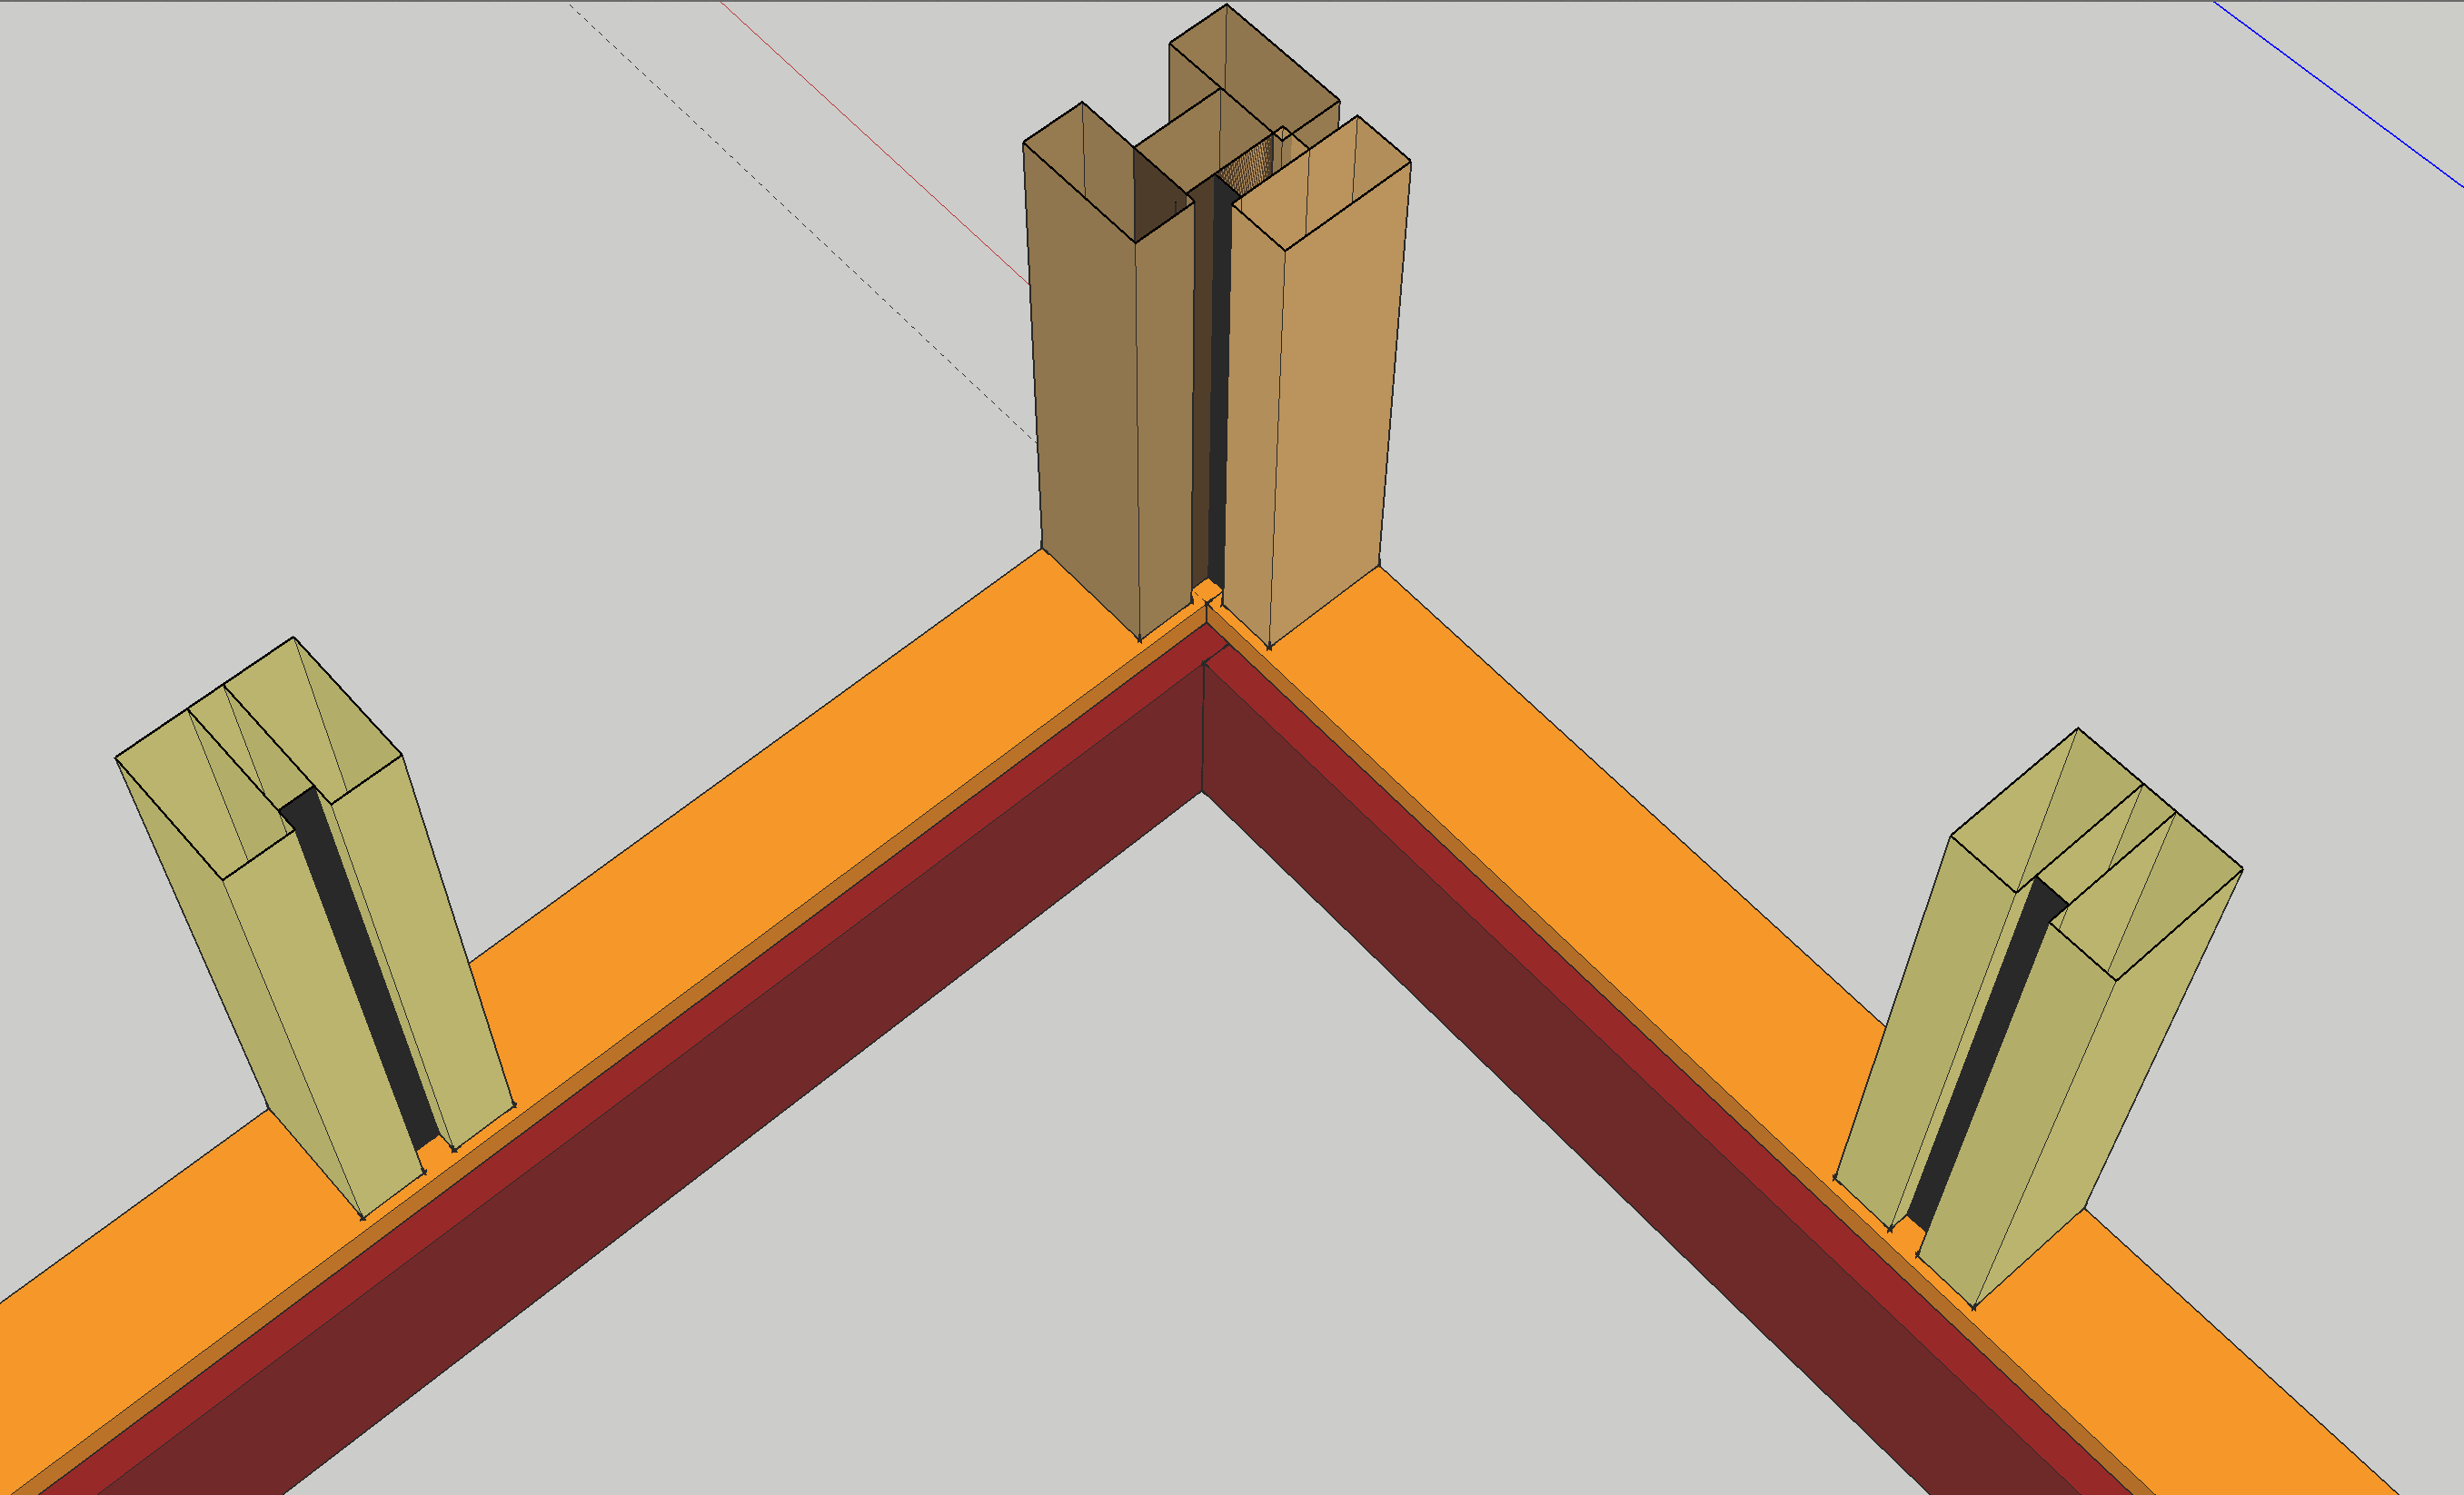
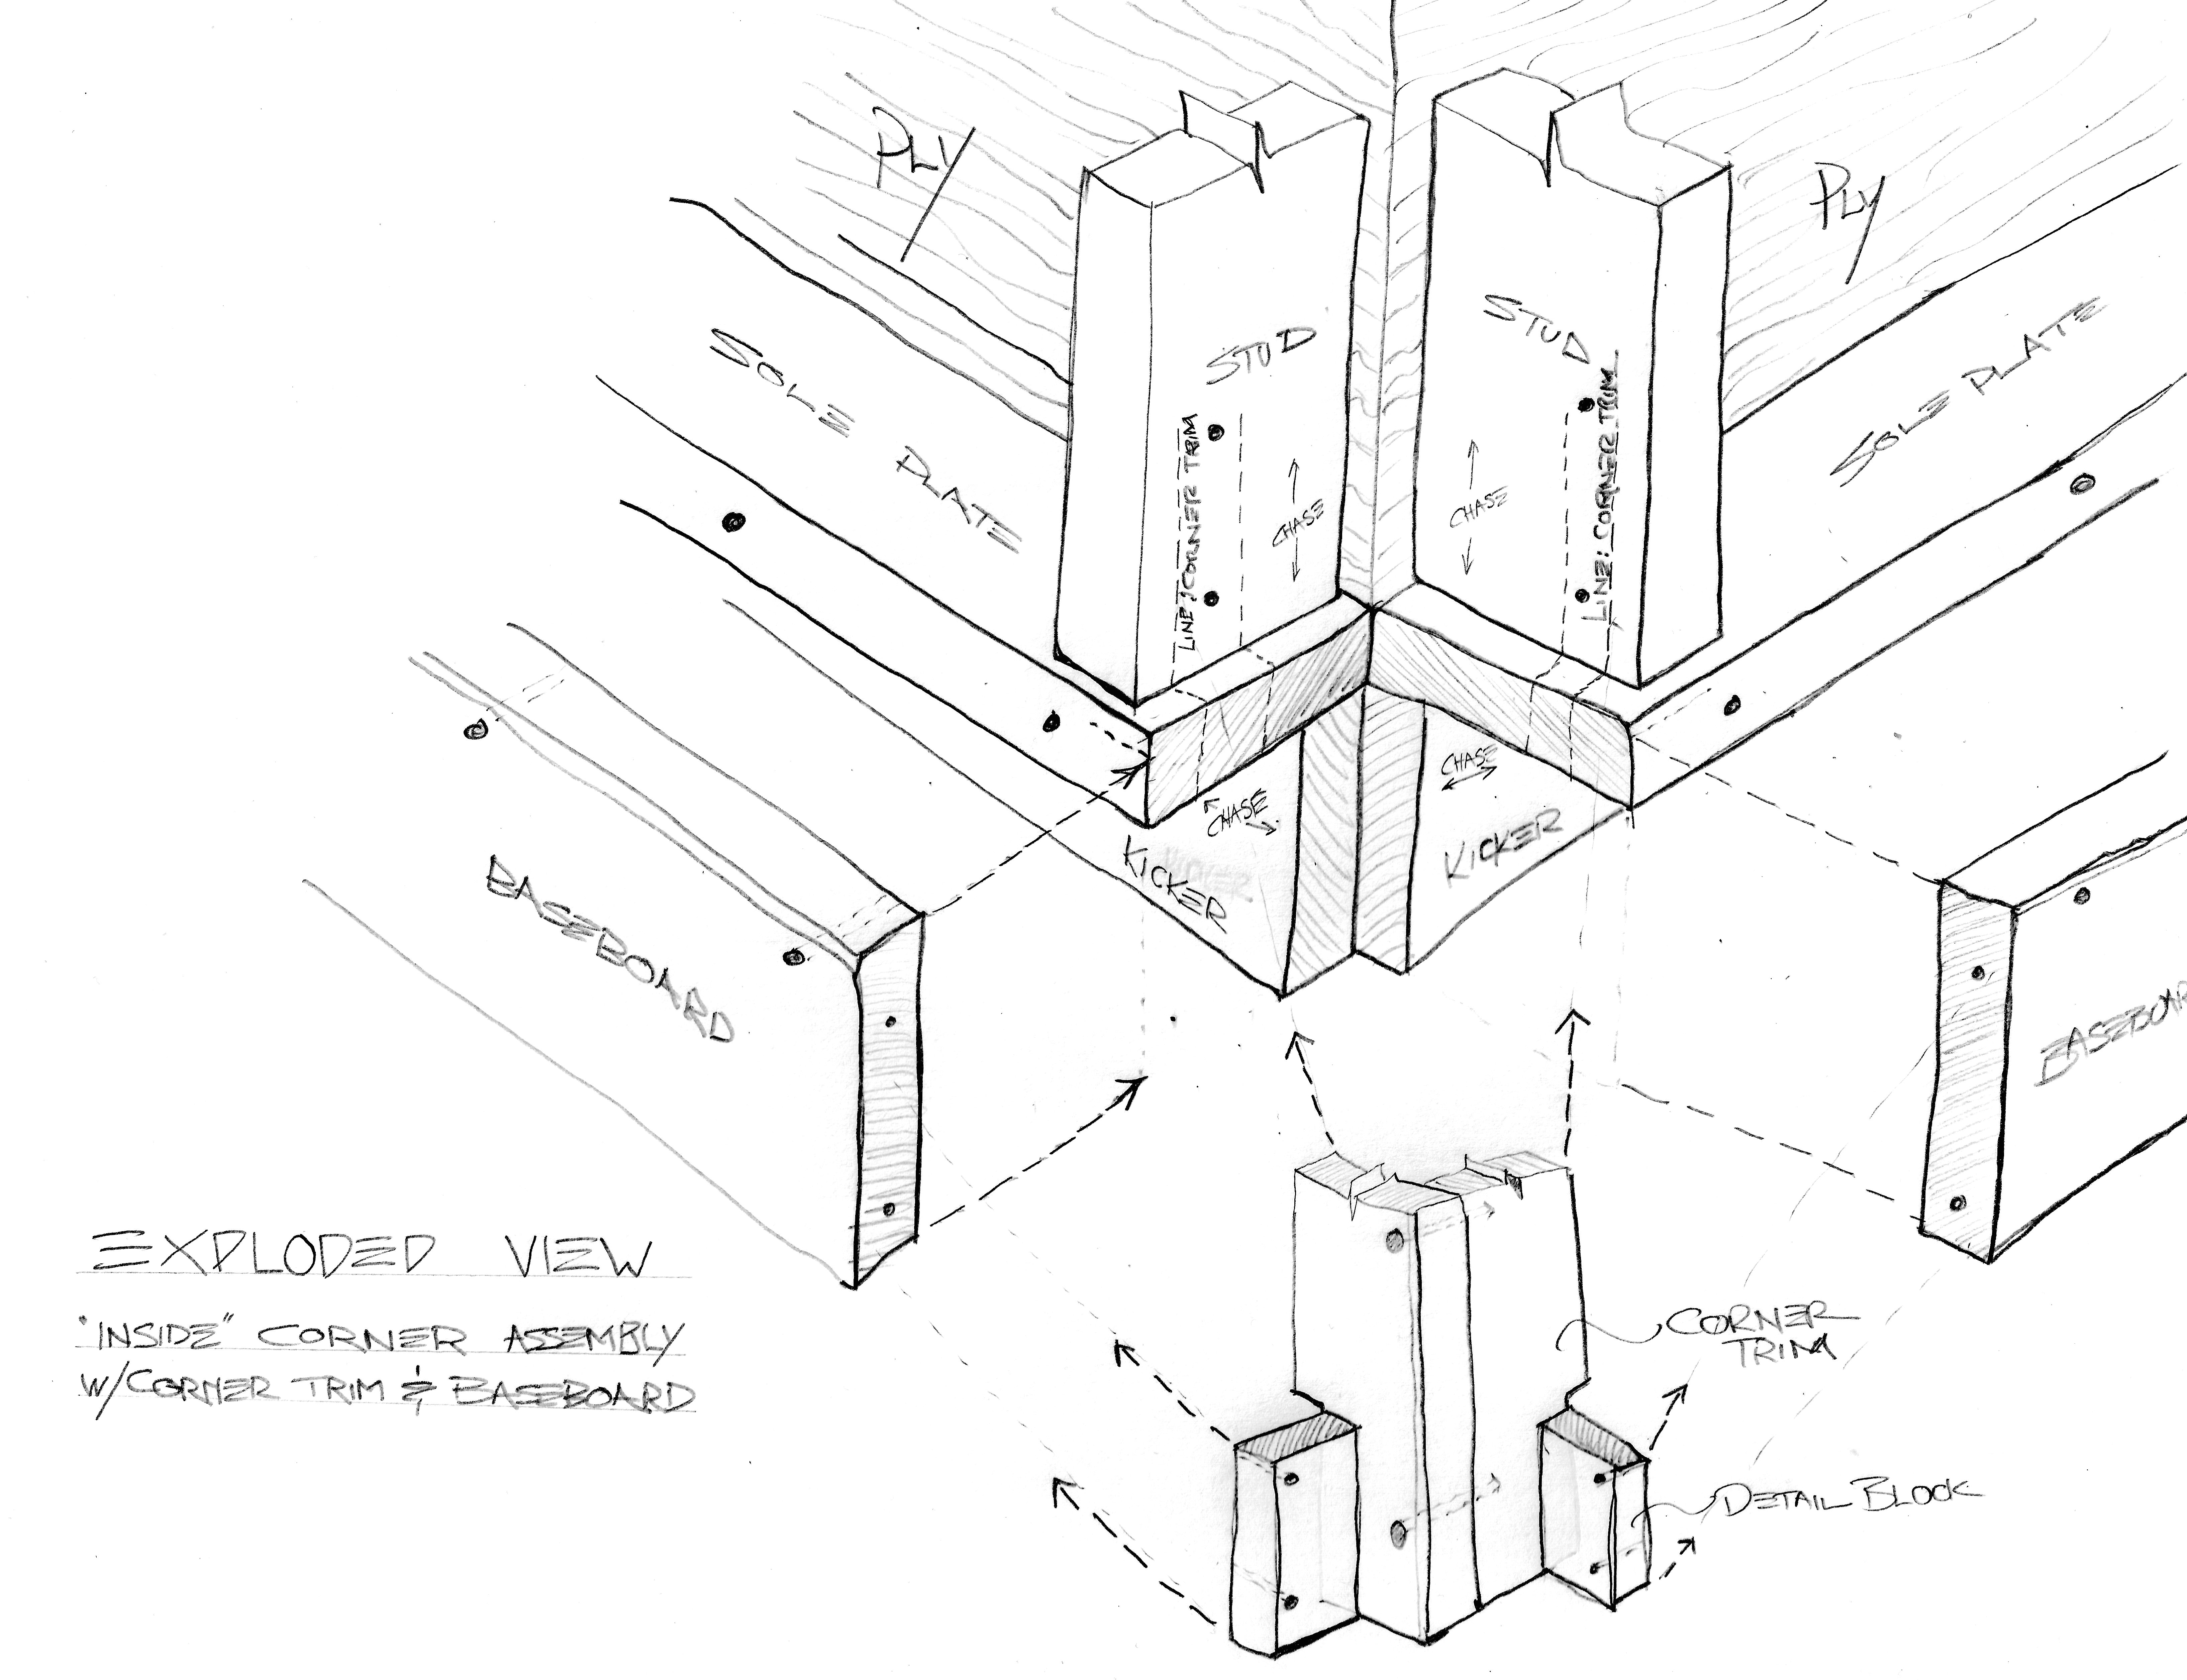
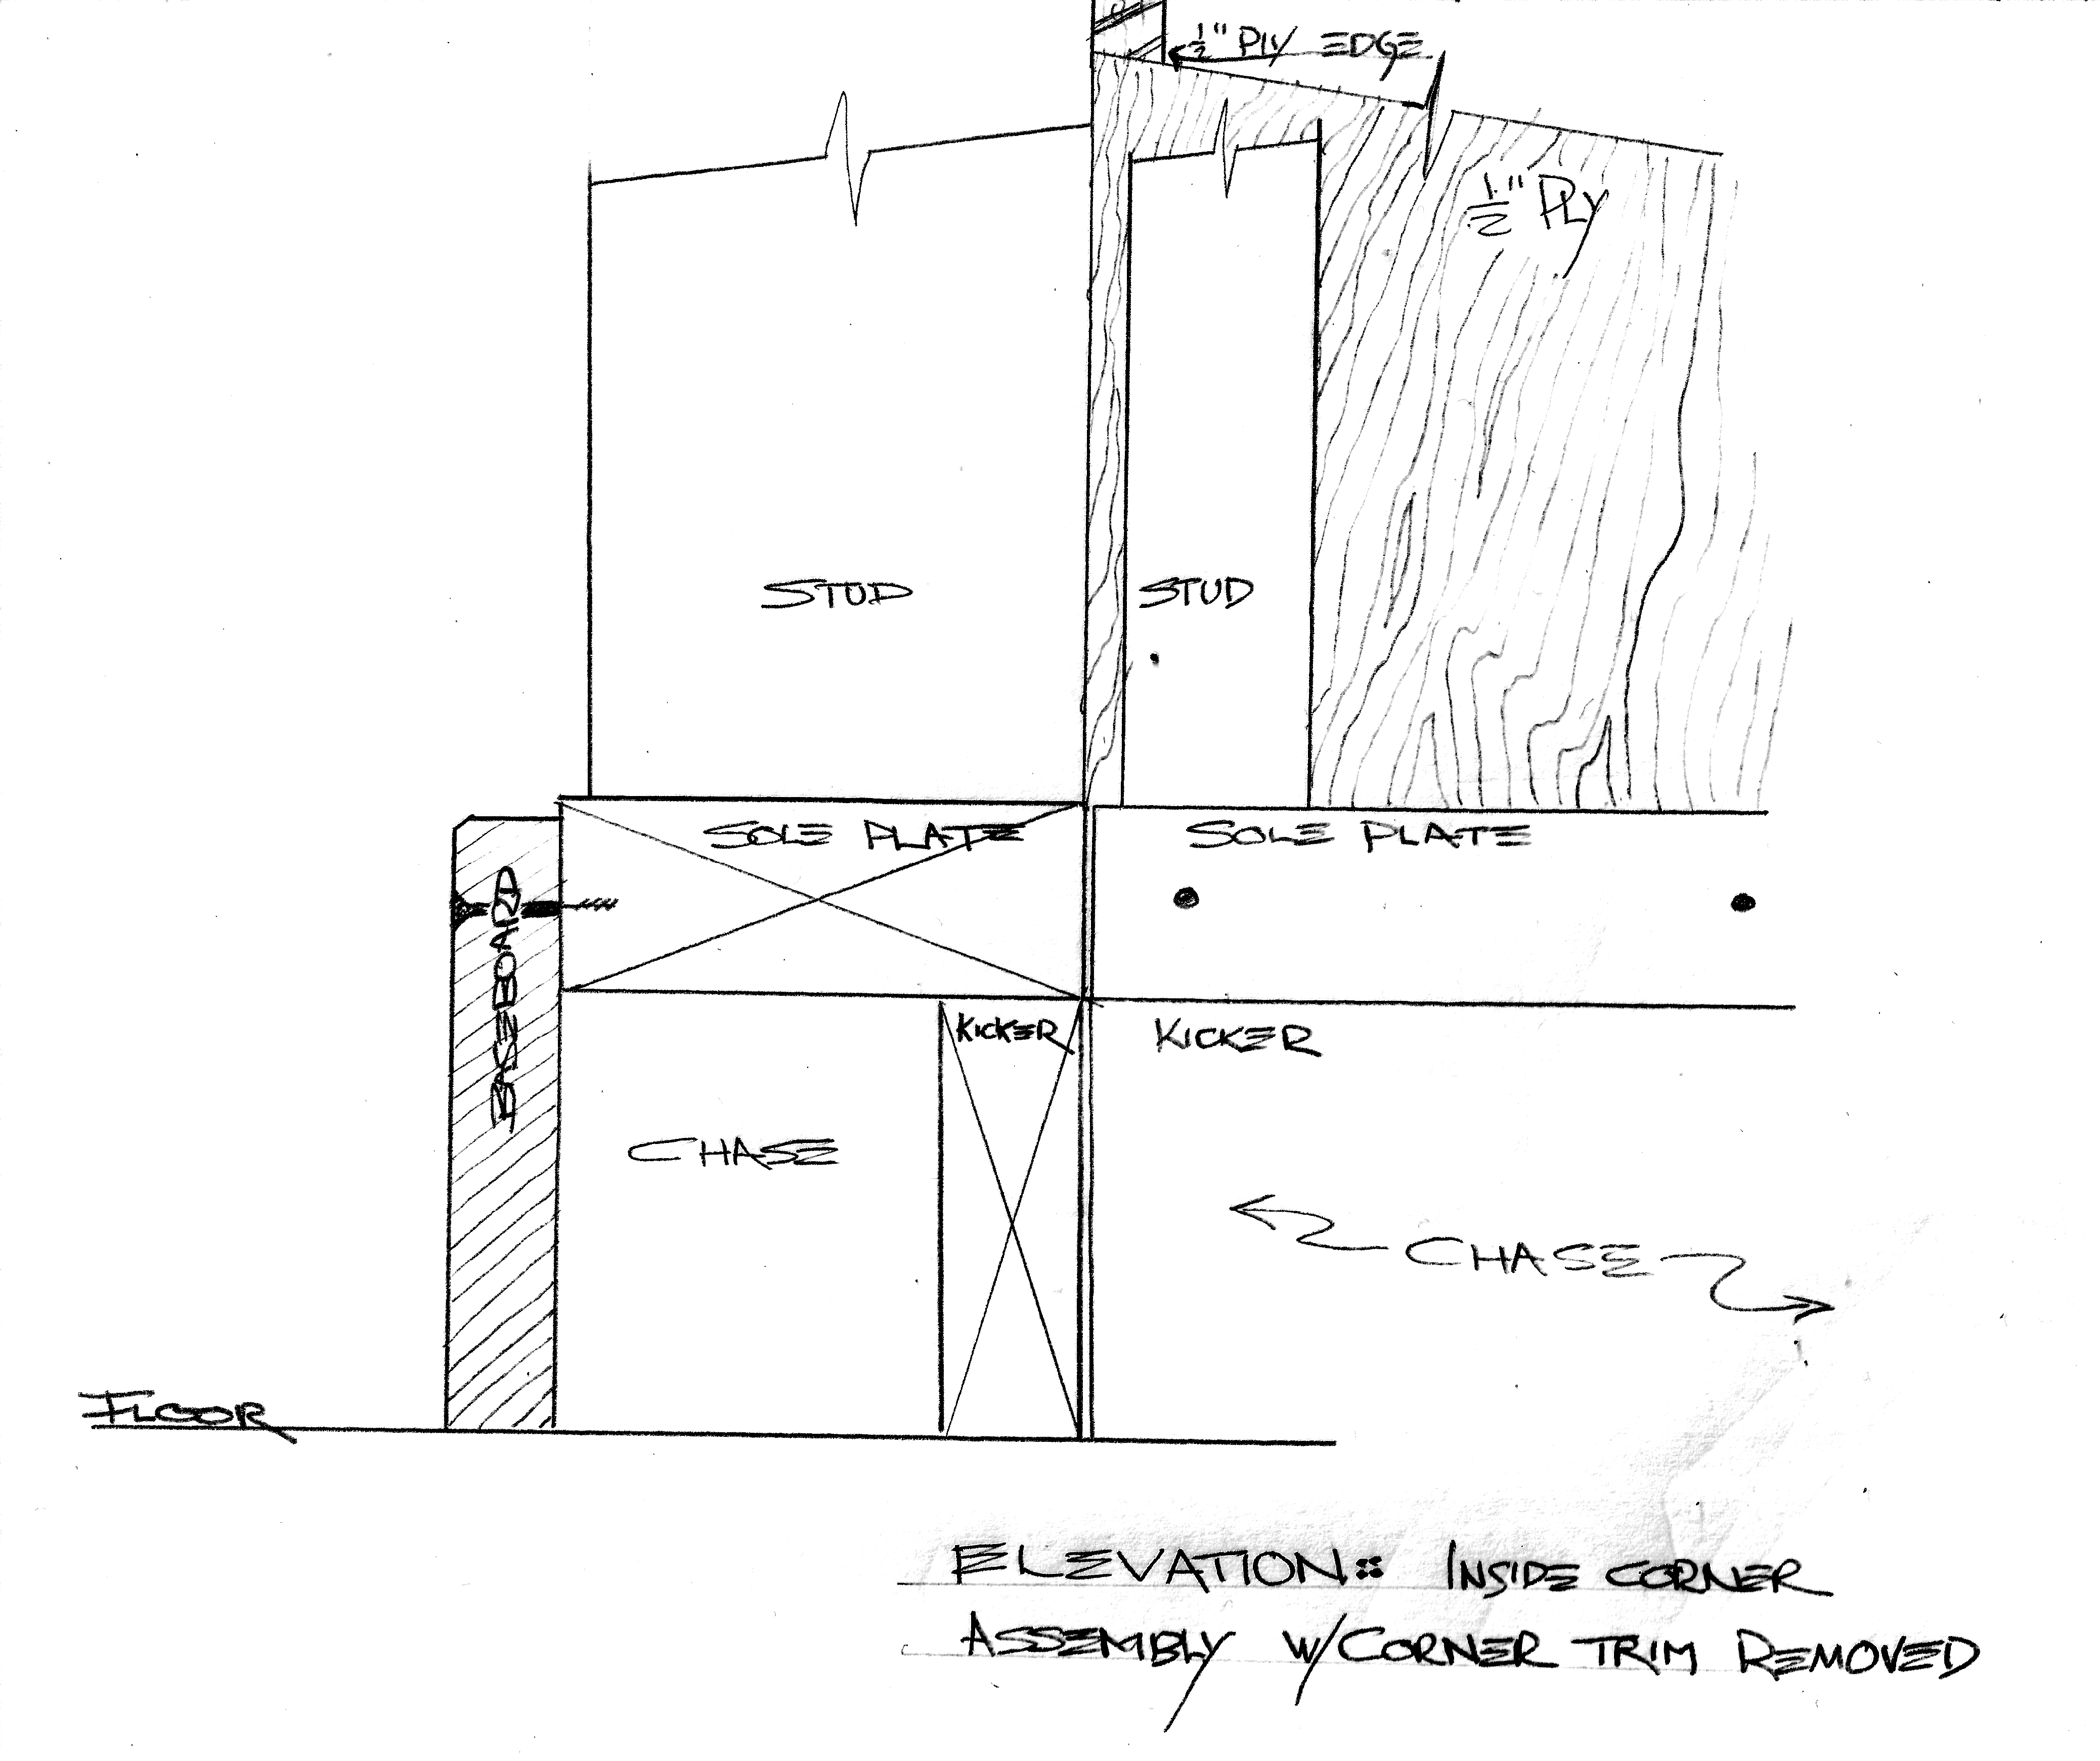
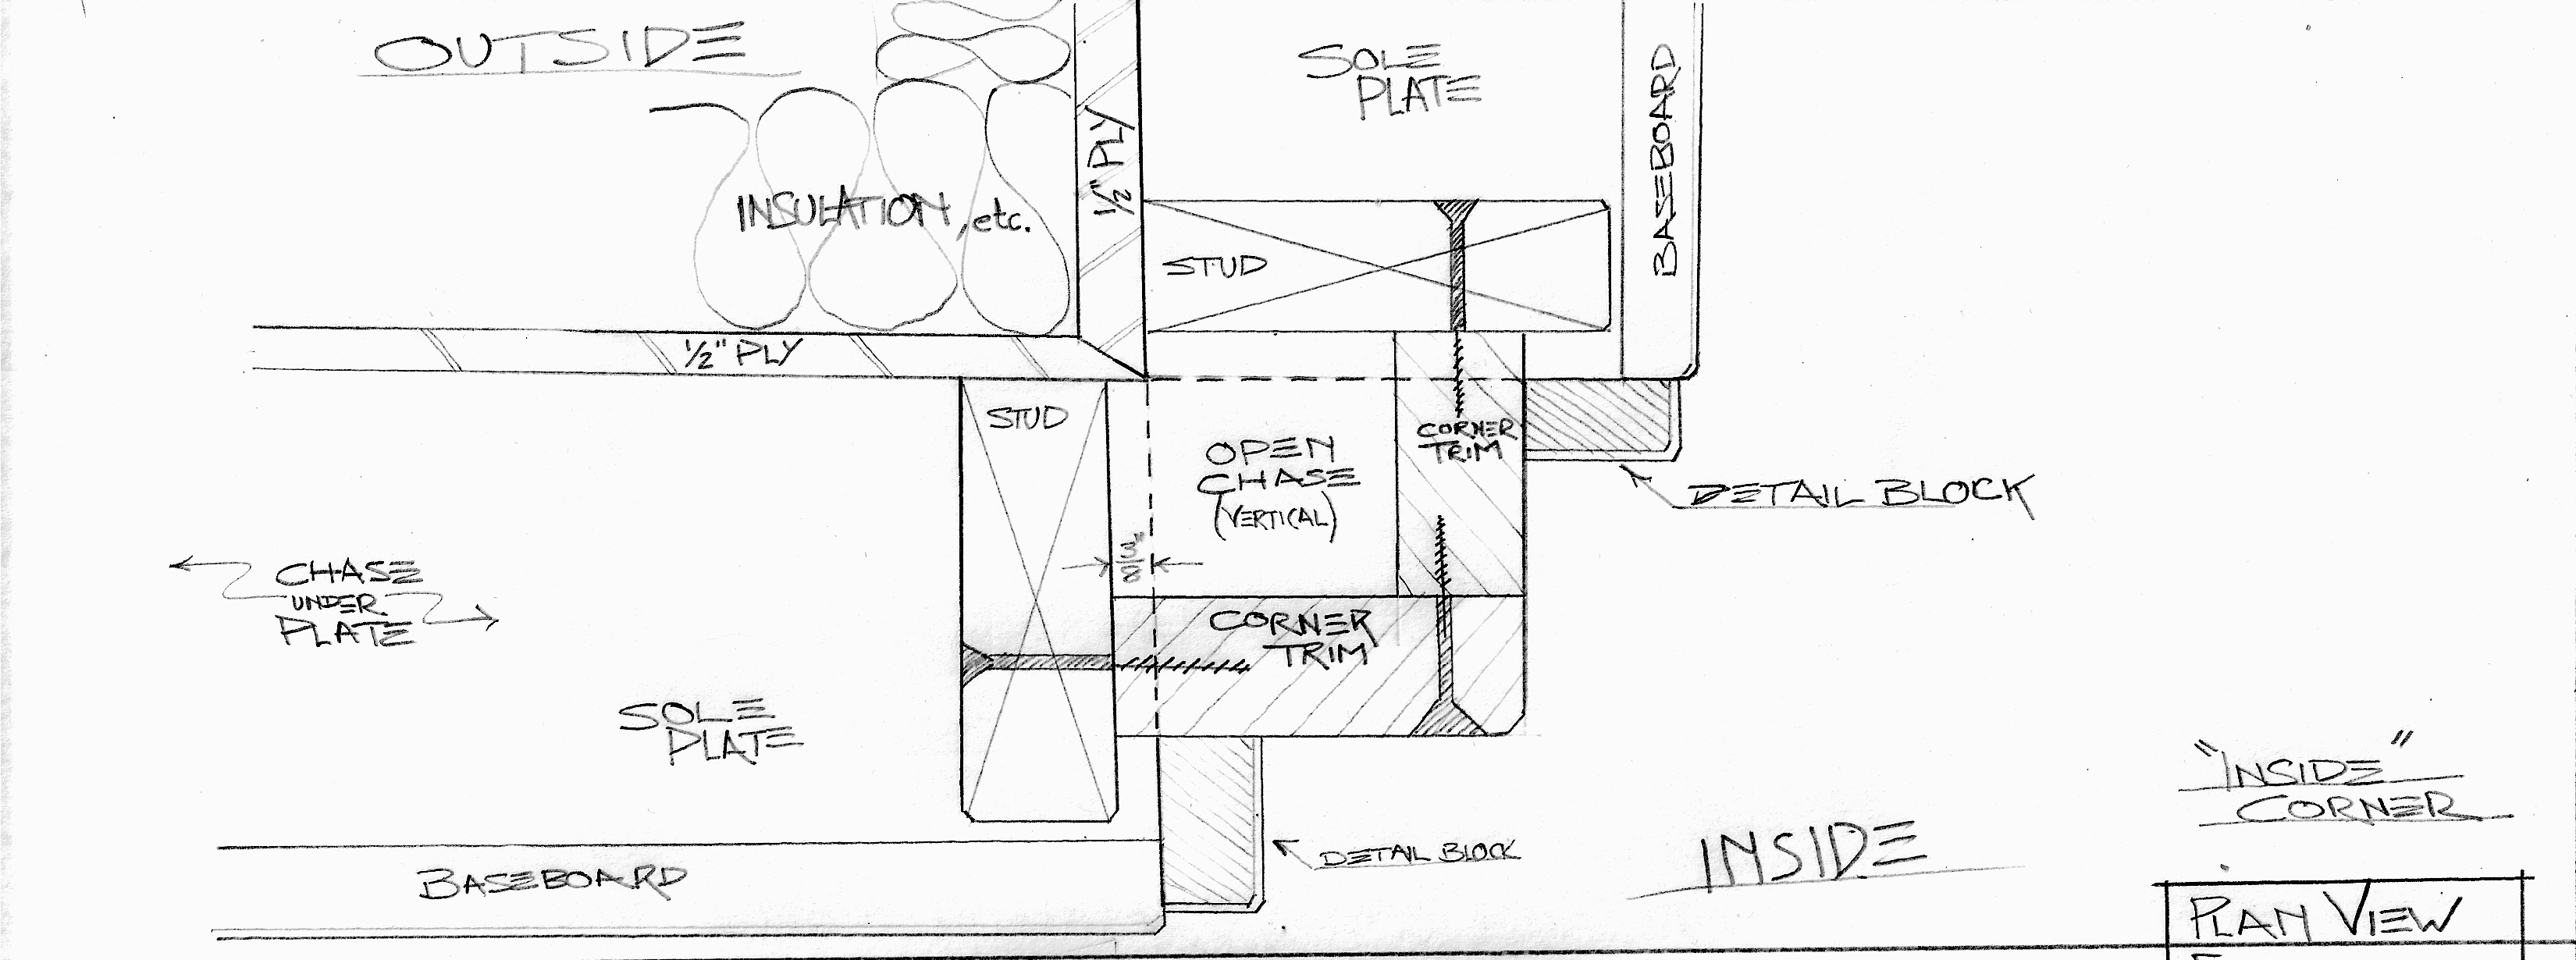
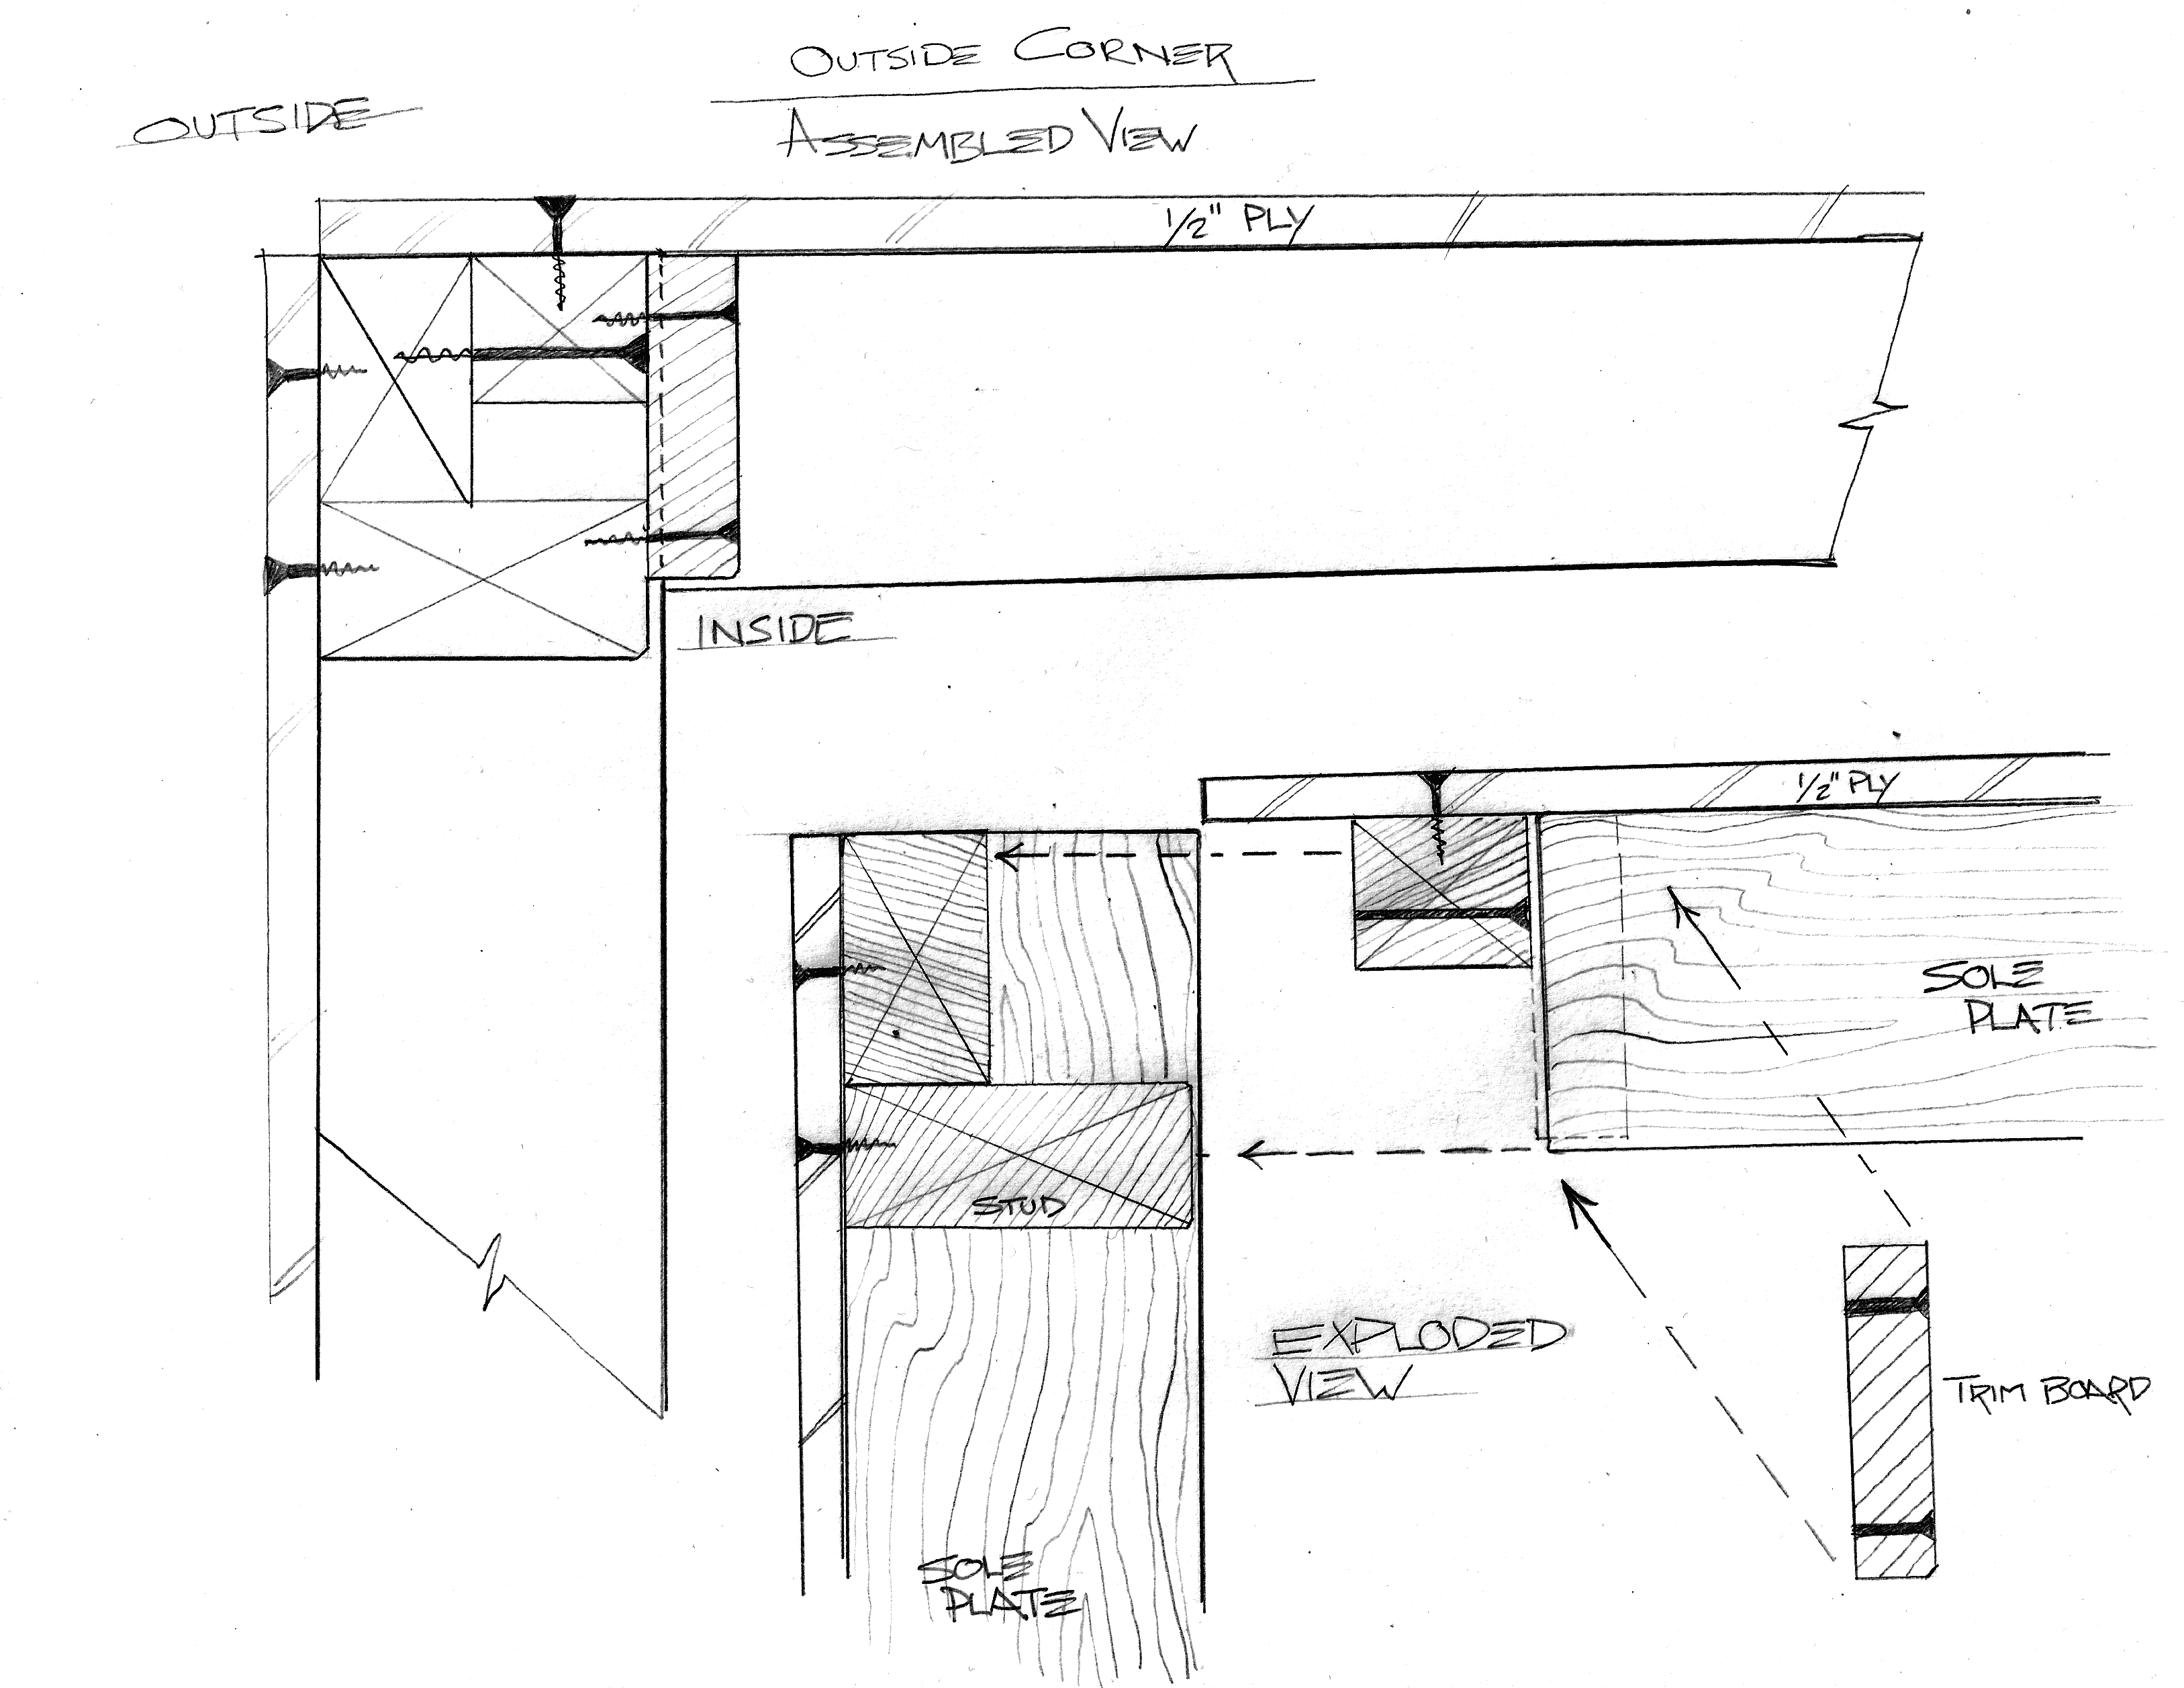
The wall panels go together at the corners with careful milling of the corner assembly studs, and one trim strip that is screwed on after the structural blocks are screwed together. On the outside, the corner is covered in insulation strips and removable corner flashing. Everything comes together on a 24" module based on plywood: the outside face of the studs is sheathed in 24" module plywood, and the floors are thus also framed to take 24" module plywood sheeting largely without cuts. On inside corners, the wall plywood must be chamfered 45 degrees on inside corner meeting edges. Both the wall plywood facing the inside of the room and the insulation and siding can thus all be on 2' modules. The corners are added on after the walls are assembled, so that the siding remains on the 24" module.
One trick that is buried in the drawings is that I need a 45 degree chamfer on the plywood edge where they meet on an inside corner. With this one detail, I can stay on my 2' module. This would be a problem in normal construction where the first 3/4" of your ply is where you put your staples. In my cases, the studs are offset from the nailing line 3/8", then there's a full 1.5" nailing surface, so there's plenty of room.
These are the standard pieces:
Then baseboards, kickers, plates, and floor-to-floor plywood ties are cut for each job.
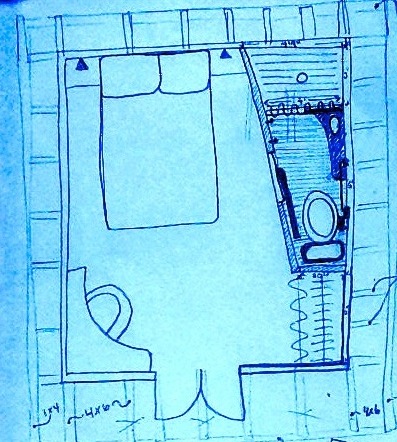
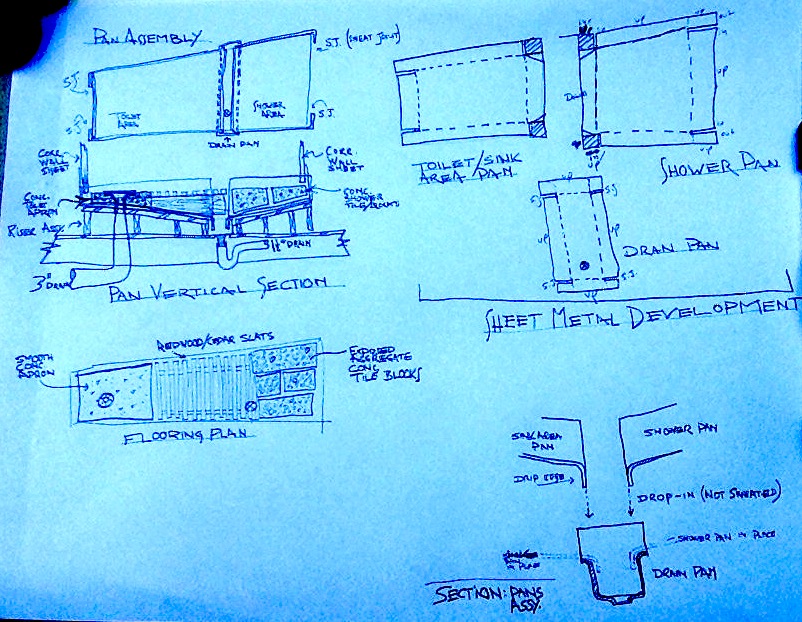
In order to make the bathroom design re-usable for building 8 bathrooms eventually, and to allow the stand-alone rooms to be disassembled from the ground floor and hoisted to their final spot on the third floor, the bathroom is designed fit together with a screw gun. Lightweight concrete will be mold-formed for a countertop-sink unit, a toilet apron, and shower tile blocks. Other areas of the bathroom are cedar wood slats. Everything sits inside a soldered galvanized metal pan. The walls are covered in corrugated steel panels.
The bathroom is custom fitted into the 12'x12' room box. So the box is the modular, reusable shape. The funky trapezoid of the bathroom is not modular, but it will be reassembled inside the relocated room.
You can see the plywood strip that joins each wall to the floor rim joist. This I will put on with screws also, so the floor is independent of the walls. However, for the bathroom, the floors and walls become more related. So that's why I intend to keep the layout within the room itself. Fortunately, everyone (Airbnb renters, college student renters, young professionals, kids, ...) wants a room with their own bathroom, bed, desk, and closet.
So the pan detail I showed is exactly so that the metal pans slide together, get screwed to the walls (no screws in the floor so no leaks), then the galvanized corrugated steel panels get screwed to the walls, then the concrete blocks put in place, then the slats dropped in, and you are ready to mount the toilet, and concrete sink counter, shower curtain bar, and exposed copper lines and custom copper shower assembly and sink assembly. All of these parts can be carried up the stairs. Connect the fittings and tailpieces below the floor via an access door, and presto-magico, one portable, installed, code-compliant bathroom!
See the detail drawings for the bathroom floor. The idea is two halves of the room are done as big pans with 6" sides turned up, and on one side, there is a 2" lip turned down. Then there's a third pan that is all drain, with a drain hole at one end of the bottom. The two halves flash up the walls, and drain down the down-turned lip into the lower drain pan.
Also not obvious in the drawing is my plan for the toilet, the piece called "toilet apron" in the drawing. This will be a mold-poured mini-slab. It will have the johnny ring flange and waste tailpiece cast into it, be tapered on the bottom to match the slope of the pan, and flat and smooth on top for easy cleaning.
The shower slabs will be tapered on the bottom slightly sloped on top, and exposed aggregate on top.
The slat boards drop into place, and the last three slats over the drain come up as a group for easy drain cleaning.
In the two plan drawings, there's a rectangular bathroom (obviated) and a trapezoidal bathroom (I'm going with this one).
The roof panels and walls and siding are 100% re-useable in place. The roll roofing from the garden cottages would be stripped from the roof panels. I'd leave the siding and insulation attached to the walls, take off the wall corners, and the floor-to-floor siding panels and flashing. Then the whole wall gets winched up to the 2nd storey roof deck, where I assemble the rooms again as stand-alone third floor rooms. Between the rooms as positioned on the 2nd storey roof deck is decking with lightweight rooftop gardens (containers with drip systems), lightweight concrete paver blocks, and wood deck panels, all over torch-down roofing. Easy to unstack, move around, fix roofing. But with torch-down on a sloped roof covered from sunlight and wind by pavers and deck panels, I expect the roof membrane to outlast me.
So my second storey roof is pitched like 1' in 10'. So decking I put atop it will be stepped up so the rooftop garden will have a few flat stepped areas. The rooms I hoist up there just need some blocking to get them to sit flat on the roof. When I torch down the 2nd storey roofing, I'll go torch up the rim joists on my 3rd storey cottages. Since I want space between the rooftop cottages, all the siding, overhangs, and windows work. This helps with the City: Average roof height must be 28'. This means if my cottages are 10' tall, my first two stories can be 18', which is either 9' per floor or an 18' space with a loft. I plan to do both. In fact, since I'm not doing 100% coverage with these rooms, they could go even taller. If I only cover 33% of my roof with cottages and stairwells, then I can go up to 35' on the cottages, and 24 feet tall on the rest of the rooftop garden. The City won't let you do a "room" taller than 18', so that still means I can have two floors of 12' in those sections, or a 9' first floor, then a lovely 15 foot second floor, which would work with a 30% loft, again. Also the City allows 30% floor overhang of lofts to be counted as one "floor".
The other nice part about cottages on a rooftop garden is privacy and stand-alone feel, which is good for renters, children, high-$$ professionals, and anarcho-hippies. I mean, a sunrise/sunset view studio near downtown, surrounded by decks and container gardens, and no shared walls with neighbors?!!! That has to be worth a sweet monthly rent. Rather than go full-blown kitchens, I'll probably tie these with stairs to the units below. And my design for the full house has multiple kitchens on the first and second storey that can be associated to different room configurations with locked doors and multiple staircases.
I'll probably put some kind of awning over the door itself (corrugated metal or clear plastic on wire or brackets) to make a kind of mini entrance porch: water protection, keep boots dry when left out, keep you dry while you unlock door, protect nice door finish.
I'll probably put planter containers up against the cottages on east, south, and west sides, which will catch plenty of water and rain, and could be fed by the gutters too. These would block the bottom 2' of the walls from splash, which is where most of the weather wear comes in, I think. On the south sides, I'm thinking of lattice work for climbing plants, too, so mostly you'd only see the metal behind the plants, which maximizes solar for the plants, and softens the visual so it's not so industrial looking.
For the rooftop version, I'm thinking of long planter boxes with nice wood fronts, crappy wood backs, tarpaper on the inside, or some other non-toxic material, each with a drain pan. I'm going to work out some kind of gutter-planter-drain-pan-drain-pond-filter-pump loop so I can recirculate the water with solar or wind-powered pumps to provide a semi-hydroponic system. When you recirc the water through soil, you pick up a bunch of acids, but people do do this, so I think I should be able to balance the acid in the pond somehow.
I toured a bunch of rooftop gardens in NYC, and found that lightweight roof gardens require these elements: vermiculite and mulch amendments, high watering, no deep-rooted plants such as corn or trees or lawn. I further found that even though these gardens were able to load up reinforced roofing no problem even with 8" of soil, they had an easy 50% area waste for walkways and unplanted parts. So I figure that with long container boxes, I can support 16" to 24" beds. With vermiculite and mulch and high drip watering, and even 20-30% area coverage of growing stuff versus walking area, the solar would be well utilized and the garden would be sweet! With 24" of roots, I can grow 24" to 48" tall plants, which will cast nice shadows on the walkways and benches. This would be lovely, since I found that most rooftop gardens and patios suffer from TOO MUCH sun and wind, and can look very stark and uninviting. Without major engineering, you can't put shade trees up there. Roof trellises with vines, and staggered buildings can help a lot, too.
Lightweight, site-molded concrete is used for a number of applications in my design: sink, shower pan, toilet apron, thermal floor tiles, and, in the first floor of the full three storey house, precast form blocks that are filled with standard concrete and rebar. This is regular portland cement, with sand, water, latex plasticizer, fibered reinforcement, and a foam agent. The foam agent is mixed with water and blown at high pressure through a nozzle and steel wool which makes tiny bubble, highly stable foam that is admixed just before placement, and lasts until the concrete begins to set. By the end of the process, the cured blocks or shapes are light enough to float in water, can be cut with saws, and can approach a density of 30 pounds per cubic foot (1/5 the density of regular concrete). No stone aggregate is used except for aesthetics, and some metal reinforcement is placed in the mold where necessary, such as a sink and counter assembly.
AR (alkali resistant) chopped fiberglass is the go-to for reinforcement. Regular fiberglass gets eaten by the alkali in concrete.
When building molds, you use a mud hopper/sprayer to spray in a half inch of schputz which is your concrete mix before you add the fiberglass. Then you mix in the fiberglass, and pour the rest into the mold. For exposed agg I would have the molds be up-side-down so that the stone slurry goes in first, then the sides are sprayed, then the metal rebar placed, then the fiberglass-reinforced bulk of the mix is poured.
Testing. This site has lots of test data: http://cellularconcretetechnologies.com/testing/ Basically, 28-day strength of aircrete is of the order of 1400 PSI compression strength for 40% air content and 70 pounds per cu. foot density. Standard residential concrete is expected in the range of 2500 PSI at 150 pounds per cu. foot (with commercial mixes yielding 4000 PSI). Actual PSI depends on the density. At 75% air content, they were getting 160 PSI. At 22% air content and 95 lbs/cu.foot they were gettting 3000 PSI. They use Vinsol Resin for the foaming agent. This is a product of Southern Pine pitch, and in powdered form can be exothermic on mixing and is also used in pyrotechnics! I will do experiments with more stable foam agents such as readily available Drexel F.M. 160 (see sources at end).
I expect to build each cottage for about 7,000 bucks each (see below). Given that they earn me $1400 every month, and sometimes up to $2000 per month, renting them out for 5 months pays off the material and hired labor investment.
My labor is probably 4 weeks for one of these bad boys, probably 6 weeks for two of them. I recently did a similar room (16'x16') in 1 week, no siding or insulation or finish, and two days of hired labor. I spent around $2000 for the wood, plywood, nails and screws.
Pressed rockwool insulation board is more expensive than fiberglass, but so much cooler (easier/more modular to install, more fireproof). It runs $47 for 8'x12', less 20% in bulk, so $0.78/sf.
Steel crimp ribbed siding runs about $1.78 a foot for 24" wide.
I'll go for some cheap wood panel for the floor, such as masonite, or carpet, so I'm not budgeting for maple, fir, or bamboo flooring. Later, rooms can be fitted with any of these, since baseboards are all removable.
All wood decoration inside is already priced in the "bones" price for wall framing and plywood, since the design uses exposed, finished wood construction materials as discussed above in "Building Details".
=========================================================================
Bones (framing, ply, trim, nails, screws):             $2000

Metal Siding: 400sf *0.89                               $356

Roll Roofing                                            $100

Insulation:
   walls: 400sf*2layers*0.78      $624
   floor: 144sf*1layer*0.78       $112
   ceiling: 144sf*2layers*0.78    $112
   Insulation total:                                    $848

Glass for doors and windows:
    2 doors,
    1 big window
    4 small transom/eve windows
    Glass total:                                         $563
                                                         -----------
Bare room total:                                               $3867

Finish materials:
    Tung Oil, 2 gallons                                  $110
    Wood stain 2 gallons                                 $110
    Toilet                                               $130
    Copper 1/2"x10'   6@$14                               $84
    BA wall sheets 2.5' galv. corr. 8@$12                 $96
    Redwood slats                                        $100
    Lightweight Concrete                                 $100
    Valves, faucets, shower head                         $100
    Door hardware                                        $150
    Lighting and wiring                                  $150
                                                         ------------
Finish subtotal:                                                $1030
                                                         =================
JOB MATERIALS TOTAL:                                                 $4897

Airbnb required items:
    Mattress, bedding, throw rugs, curtains, towels, doodads          $800

CA Sales tax 10%                                                      $569

Labor: 3 helper-days per room @$160/day                               $480
===============================================================================
GRAND TOTAL FINISHED RENTAL ROOM:                                         $6746